
Palo Alto GlobalProtect Issue: Split Tunnel VPN with Skype for Business

There was a weird issue when I first joined my current job: I was told was that because of the way Palo Alto GlobalProtect (GP) and Microsoft Skype for Business (SfB) works (or maybe was configured?), I needed to log-in to SfB first, then connect to the GP VPN. The rationale was that SfB wouldn’t connect, or it would take a long time to connect, AND THEN even after a period of time, SfB would start behaving weird and it’s Exchange connectivity would drop, so SfB wouldn’t get voicemails, missed calls, etc. Just all out weirdness going on. It’s 2020, so maybe some of this true to form for the year, but probably not.

Palo Alto GlobalProtect Skype for Business

Click here if you want to skip the context and go to the solution.

Uh…Skype for Business?

Full stop. I’m sure you’re asking yourself right now, “Why not just migrate to Microsoft Teams? Get rid of that whole on-premises stuff.”

Let me answer that in a meme:

Sean Beam Boromir Meme: One does not simply migrate from Skype for Business to Teams

Skype for Business is one of the integrative technologies that spans lots of technology stacks that isn’t exactly easy to just jump ship from, and Teams as a VoIP replacement is arguably not there yet.

Also, have you seen the UI comparisons? Going from a sleek floating window for calling, IM, and conferencing with SfB to the giant-lets-pack-lots-of-services-into-one-large-window that is Teams is kind of a hard sell on the user training side of things. Maybe I’m biased. Maybe, but I digress.

The Challenge

Ok, back to the GlobalProtect and Skype for Business issues.

I was admittedly puzzled that the solution — to instruct users to sign-in to SfB before they sign-in to the VPN — was the best solution; it doesn’t seem right from a user experience perspective, and then when you toss-in the sudden weird issues with Exchange connectivity, none of this seemed right, and I doubt that’s the ideal experience. So I brought this up and the team basically said, “we just haven’t had time to troubleshoot it, but if you want to figure it out, go for it.”

You know what that sounds like? An adventure. An itch to itch. Something to solve. A challenge! There could be only one response:

Challenge Accepted Meme

Why Split Tunnel Skype for Business?

Something you might be asking is “Why configure split tunnel in the first place? Isn’t split tunneling a headache to manage?”

Split tunneling can definitely be a PITA, but like a million IT questions out there, the answer ultimately to this is, “it depends.” From my experience, split tunneling becomes difficult when you have a lot of split tunneling to manage, but if you have one or two services, it’s not that bad.

For Skype for Business, it’s one of those technologies that is sensitive to jitter, latency, and packet loss. Why? It’s because it’s voice traffic, and just like voice traffic on the inside of the network, where there’s jitter, latency, and/or packet loss, users on opposite ends of calls/conferences will experience this as delayed audio or parts of the conversation will just break up and it leads to an overall poor experience.

When you configure split tunneling, particularly for technologies like SfB, you avoid the dual encryption scenarios and you allow the technology to use its own optimized methods for connecting voice and application traffic by letting the software connect to services over the internet directly versus through a tunnel.

Baseline

That said, what’s the baseline here? How is GlobalProtect configured with split tunneling and what issues are there?

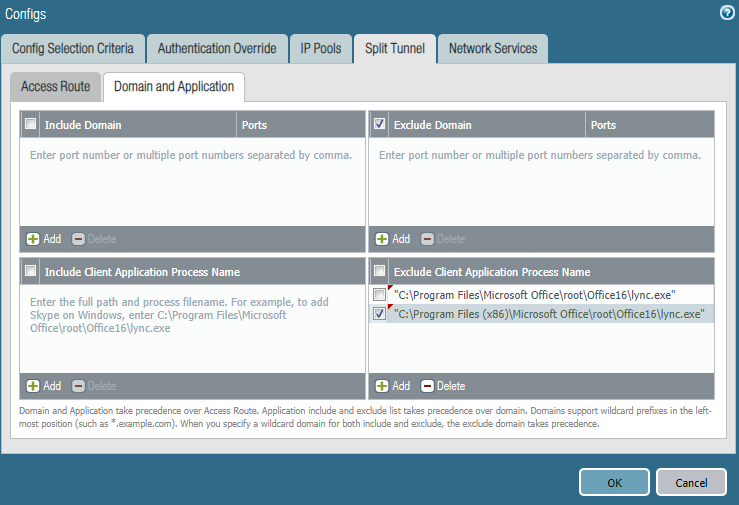
For GlobalProtect, the split tunnel configuration was configured pretty much like this documentation from Palo Alto (using just the application split tunnel, nothing else). It looked like this:

GlobalProtect Split Tunnel Domain and Application Tab Showing Excluded lync.exe

Here are the issues that were encountered in this setup:

  1. Connectivity issues if connecting SfB after GP VPN is connected
  2. Exchange connectivity in the SfB client drops after a duration of time, even if connection is established before VPN connection
  3. Call transfers working inconsistently
  4. Application sharing working inconsistently
  5. Conference meetings working inconsistently

Issues 3-5 really came later because they were hard to pinpoint due to their inconsistency, but issues 1 and 2 brought some fast wins.

Let’s get to some solutions.

Solutions

Solution for 1 and 2: DNS. It’s always dns.

It’s kind of a joke, but DNS really does cause a lot of problems, and in a split tunnel configuration when you’ve split-tunnel the traffic by application, the application is still going to resolve addresses by the servers you specify in the GlobalProtect configuration. So if you haven’t changed DNS records, the application will split tunnel, but it will still try to connect to internal resources because that’s the records it has.

I don’t have a PCAP screenshot for this, but if you pull up Wireshark and look at the PCAPs for your network interface (non-GP interface), you’ll see attempts to get to SfB internal IP addresses that aren’t (typically) on your network, and thus services fail.

The solution is simple: for your VPN clients, serve the external IP addresses for A records being queried. I solved this by setting up dedicated DNS servers for VPN clients, then just creating the zones and root records for each FQDN. I did this for all the Skype for Business external IPs (edge and reverse proxy) and the external Exchange records.

After doing this, problems 1 and 2 went away because hostnames were being resolved correctly.

Solutions for 3 through 5: Firewall rules and IP Split Tunneling

Problems 3 through 5 were frustrating like no other because I couldn’t really narrow the problems down exactly. Some people had no problems with call transfers, application sharing, or conferencing, but then sometimes they would. So the thing to do is dig into the logs, and when I did I encountered a lot of this:

ms-diagnostics: 23;source="mediationServer.contoso.com";reason="Call failed to establish due to a media connectivity failure when one endpoint is internal and the other is remote"

Or

ms-diagnostics: 24;source="mediationServer.contoso.com";reason="Call failed to establish due to a media connectivity failure when both endpoints are remote"

Or even better:

ms-client-diagnostics: 52049; reason="Leaving app sharing because re-invite failed";UserType="Callee";MediaType="applicationsharing-video"

These all pointed to firewall issues, and even the ICEWARN messages noted something wrong with STUN, TURN, NAT, etc.

So I did some digging and found that firewall rules needed to be in-place to prevent VPN clients and internal SfB servers from communicating with one another. So I added some PAN policies, and things got better, but not perfect. Also, I added the external SfB IP addresses to the split tunnel in Network > GlobalProtect > Gateway > Agent > Client Settings > Client-Config > Split Tunnel > Exclude (which basically just adds static routes in the Windows routing table to send traffic for those IPs out the non-tunneled interface). Still the occasional error creeping up, and I could even witness it, but still can’t quite nail the problem.

Finally, I had a thought: why not get rid of the application process split tunnel? I mean, if I have DNS addreses configured, and IP split tunneling working, why is the application process split tunnel needed? Removed that from the setting and bam — all the problems went away. Like magic.

Shia Labeouf Magic

Here’s what the final outcome should look like for a GlobalProtect-Skype for Business-Exchange environment for split tunnel.

Palo Alto GlobalProtect Skype For Business Split Tunnel

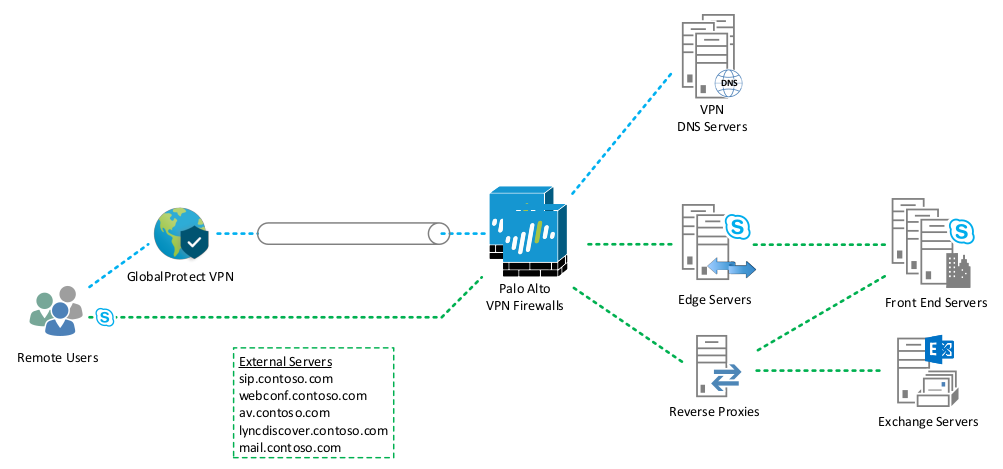
Of course, I fully admit this is really more of a legacy design with everything on-premises, but you could just as easily send the Exchange traffic to Office 365 in the split tunnel.

Thoughts on GlobalProtect Application Process Split Tunnel

While I had configured the traditional methods of doing split tunnel configurations (IP split tunnel and DNS servers), I’m still a little puzzled to the fact that the Palo Alto GlobalProtect application process split tunnel seemed to cause issues. My guess is that something in the way the Skype for Business client is designed prevents the process from being completely split tunneled, and I think this has to do with the way Skype for Business operates with Windows.

If you get really bored on a Friday night and have nothing better to do in life, check out some of these deep dives on candidate path selection and other stuff related to media flow. What you’ll see in the SfB client log files is something like this:

Skype for Business candidate selection
Credit

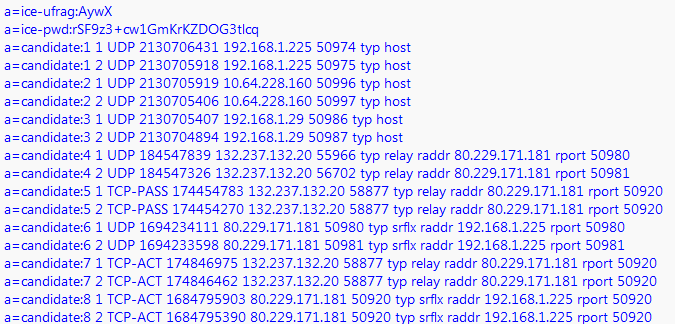
Basically, SfB gets a selection of candidates that it uses from the interfaces on the computer. In a GP split tunnel set up (with or without application process split tunnel configured), you’ll see ALL IP addresses (including the tunnel address) listed as candidates, and my suspicion is that Skype for Business still tries to use a tunnel interface, and sometimes it gets around the Palo Alto GlobalProtect application exclusion, and then that causes calls, application sharing, and even conferences to fail. I can’t show my own logs seeing this for security reasons, so you’ll have to trust me on that one.

Solution (tl;dr)

Here’s the quick solution for GlobalProtect and Skype for Business Split Tunnel

  1. Create separate DNS servers for VPN clients and create the specific Skype for Business DNS records needed, and configure them for external IP addresses so that Skype for Business resolves external addresses and configures itself appropriately.
  2. Create firewall rules that block traffic to/from the VPN network to internal Skype for Business and Exchange IP addresses. We want the SfB client to determine it can’t go inside for traffic.
  3. In Panorama or PANOS, under Network > GlobalProtect > Gateway > Agent > Client Settings > Client-Config > Split Tunnel > Exclude, configure all external SfB addresses so that the GP client doesn’t send traffic for those IPs through the tunnel. Alternatively, under Network > GlobalProtect > Gateway > Agent > Client Settings > Client-Config > Split Tunnel > Domain and Application > Exclude Domain, you could add the SfB external FQDNs (that said, IIRC, the stuff under ‘Domain and Application’ requires the GlobalProtect license…technically).

Links, Further Reading, Credit

Juniper EX3400: How to Recover from PoE Firmware Upgrade Failure

Updated 20200117. See below.
Updated 20200308. I might have a path for upgrade success. Maybe.

Did you know Juniper EX switches have PoE firmware updates to be applied?

Chelsea Lately - Great question. I had no idea.

Well, I didn’t until about a year ago when I did an upgrade and was checking on PoE power. Looking at the controller info from show poe controllerI noticed the following:

Juniper poe firmware available

Huh. Ok. Well, I’ve got a eight unit stack here, and the Juniper EX software upgrade is usually pretty solid, so let’s upgrade it — and it goes off without a hitch.

Fast forward nine months later, and I’m running into strange issues with PoE and Mercury door controllers, particularly model ‘MRE62E’. Basically the Juniper switches won’t provide power to this model, but the older MRE52’s had no problem. Checking out the firmware version using show chassis firmware detailI noticed that the switch had the older 1.x firmware and not the new 2.x.

PoE firmware 1.6.1.21.1


Alrighty then — let’s upgrade this stack. I upgrade the software using the latest JTAC recommended version (staying in 15.x), then upgrade the PoE firmware — no problem. Door controller is now getting power, I see a MAC address. Everything is hunky dory.

Now let’s upgrade this other stack.

No problems on EX software upgrade. Great. Now upgrade PoE firmware…

Ten minutes later, I get the following on the terminal:

Magic Thread Message

Of note, and the thing that made me panic, was that out of nine switches in the stack, only one came back online. Checking the firmware versions, I see the following:

Various PoE firmware versions, some missing, some 0.0.0.0.0, only one 2.x

Okay… F***. Well, let’s reboot the stack; perhaps a reboot is needed*. After reboot, I get the following:

PoE Device Fail on FPC 8. All but FPC 2 are missing.WTF.

Guy shaking head mouthing WTF

In the past when I’ve done a PoE firmware upgrade (between now and when I first learned about it), I had no recourse but to RMA the switch. Well in this case, I don’t have eight spare switches to fill this temporarily while I wait for an RMA! WTF am I going to do?!

Solving the PoE Firmware Upgrade Failure

If you’re in the same situation as I was in, take a deep breath — you’re not dead in the water.

There are two three scenarios for a PoE firmware upgrade failure that I’ve encountered, and I have a solution for both:

  • PoE Firmware Failure #1 – After firmware upgrade, you see a mixed result of firmware versions, some being 0.0.0.0.0, some being correct (2.1.1.19.3**), and some missing/blank (see picture above showing mixed/missing versions)
  • PoE Firmware Failure #2 – Perhaps you did as I did and rebooted and the PoE controller shows one with the message DEVICE_FAILED (see above)
  • PoE Firmware Failure #3 – #2 option doesn’t work and nothing you do is getting the PoE controller to upgrade. You may also have the process hang during the download, or if the controller is still at DEVICE_FAILED and you try to upgrade, you get a message Upgrade in progress, even after a reboot.

In all these solutions, here are some tips/info about the Poe upgrade procedure until Juniper fixes the process for upgrading them all at once:

  • Upgrade one at a time.

Solution for PoE Firmware Failure #1

If you encounter this failure, DON’T REBOOT THE STACK. You’ll make your life harder if you do.

Next, Juniper TAC (finally) has a solution — and it requires remote/on-site hands. If you’re going on-site or working with someone remotely, get yourself a cup of coffee (or beverage of choice) and some podcasts lined-up, because you’re going to be doing this awhile (~10 minutes for each switch/fpc).

From their site, the solution is the following (with my own notes):

  1. Power cycle the affected FPC (re-seat the power cord). Do not perform a soft reboot.
  2. After the FPC joins the VC or the standalone device reboots, execute one of the following commands in operational mode:
    request system firmware upgrade poe fpc-slot <slot>

    or
    Note: This is the method I used
    request system firmware upgrade poe fpc-slot 1 file /usr/libdata/poe_latest.s19
    JTAC Note: You need to change the fpc-slot number accordingly. Also, it is recommended that you push the PoE code one by one instead of adding all members in the virtual-chassis setup. (Emphasis mine)
  3. After the above command is executed, the FPC should automatically reboot. If not, reboot from the Command Line Interface.
    Note: Be patient and wait. No, seriously…wait. It takes awhile. If you need to reboot, you’re rebooting the whole unit AFAIK:
    request system reboot
  4. After the FPC is online, check the PoE version with the show chassis firmware detail command. The PoE version should be the latest version (2.1.1.19.3) after the above steps are completed.
  5. If the version is correct, the PoE devices should work.
  6. Repeat the above steps to upgrade the PoE versions on other FPCs in the virtual-chassis setup.

The one thing to note that when it’s doing its upgrade is that you can see the progress with show poe controller, but at some point it will hang at 95%, then disappear, then come back, then the process will be complete — in other words…WAIT, unless you want to try out the solution for failure #2. 😆

Solution for PoE Firmware Failure #2

In this scenario, you rebooted the stack and something failed. The following is similar to solution #1, but the failed PoE controller requires to basically upgrade it twice. The steps:

  1. Execute the following command to reload the firmware on the FPC:
    request system firmware upgrade poe fpc-slot 1 file /usr/libdata/poe_latest.s19
    Note: You need to change the fpc-slot number accordingly.
  2. The PoE controller will disappear when you run show poe controller, then come back and start upgrading like this:
    PoE firmware upgrading
  3. After the firmware upgrade completes, the firmware will likely be incorrect (it always was for me). Power cycle the affected FPC (re-seat the power cord). Do not perform a soft reboot.
  4. After the FPC joins the VC or the standalone device reboots, execute one of the following commands in operational mode:
    request system firmware upgrade poe fpc-slot 1 file /usr/libdata/poe_latest.s19
    JTAC Note: You need to change the fpc-slot number accordingly. Also, it is recommended that you push the PoE code one by one instead of adding all members in the virtual-chassis setup. (Emphasis mine)
  5. After the above command is executed, the FPC should automatically reboot. If not, reboot from the Command Line Interface.
    Note: Be patient and wait. No, seriously…wait. It takes awhile. If you need to reboot, you’re rebooting the whole unit AFAIK: request system reboot
  6. After the FPC is online, check the PoE version with the show chassis firmware detail command. The PoE version should be the latest version (2.1.1.19.3) after the above steps are completed.
  7. If the version is correct, the PoE devices should look like this:
    Successful PoE firmware upgrade
  8. Repeat the above steps to upgrade the PoE versions on other FPCs in the virtual-chassis setup.

Just like solution #1, one thing to note is that when it’s doing its upgrade you can see the progress with show poe controller, but at some point it will hang at 95%, then disappear, then come back, then the process will be complete — in other words…WAIT! You don’t really want to re-apply this whole process, do you?

Solution for PoE Firmware Failure #3 (Update 20200117)

I recently had some more issues, and solution #2 just wasn’t doing the trick, so I offer solution #3, which I’ve had success with but there’s a caveat/rabbit hole that may come of it. This is the nuke-from-orbit approach on the switch if you want to avoid doing an RMA (or if you have no choice).

The gist of it: disconnect the switch from the VC (if connected), perform an OAM recovery, zeroize and reboot the switch, then perform the firmware upgrade.

From my experience, there are a few different scenarios that you’ll encounter when you need to use this method:

  • During the firmware upgrade, the process just hangs/stalls. You’ll run show poe controller and at some point the download hangs/stalls like this:Terminal shows download hangs at 50%
  • You receive a DEVICE_FAIL for any reason and nothing is resolving it, like this:PoE Device Fail on FPC 8. All but FPC 2 are missing.
  • You’re switch is stuck at upgrading the firmware. No matter what you run, the switch displays the following message: Upgrade in progress. In this scenario, the switch just thinks it’s still in the process of upgrading, but no matter how long you wait (or if you can’t wait some indefinite period of time for it to upgrade), the switch won’t upgrade the firmware.

What we need to do at this point is just get the switch to fresh state so that we can upgrade the PoE controller; and believe it or not, this is actually one of the awesome things about Juniper equipment: when one component of the switch is hosed, the entire switch isn’t hosed and can still function normally. For instance, I have had a switch have a failed PoE controller, but the switch still operated like a non-PoE switch without issue; i.e., Juniper allows for components to be recoverable.

Here’s the solution I came up with:

  • Step 1: Zeroize the switch: request system zeroize
    In this step, we’re just starting fresh and clearing out the configuration, which takes about 10 minutes and then reboots. If the switch still thinks there’s an upgrade in progress for the PoE controller, we’re clearing it out. It’s possible that this may fail due to storage issues. If that’s the case go to the next step, otherwise skip to bullet #3.
  • If step 1 fails: Perform an OAM recovery: request system recover oam-volume
    This is an optional step, and I’ve had to do this when zeroize would fail. If step #1 happens, try this first. takes about 10 minutes as it copies the OAM partition then compresses it for the Junos volume.
    Caveat: EX3400s, even in 18.2 land, still have storage issues sometimes. I have one switch that couldn’t recover from oam-volume, and I’m not sure why. I’ll update this once I have a solution.
  • After the switch reboots, the controller will still come up as failed when you run show poe controller. Go ahead and run the upgrade again:
    request system firmware upgrade poe fpc-slot 1 file /usr/libdata/poe_latest.s19
    It should behave like this after running the command:PoE upgrade process for Juniper
  • The switch should behave normally at this point, upgrading normally. If it doesn’t then you’ll likely need to replace the switch (or live without PoE).

And reminder, just like solution #1 and #2, one thing to note is that when it’s doing its upgrade you can see the progress with show poe controller, but at some point it will hang at 95%, then disappear, then come back, then the process will be complete — in other words…WAIT! You don’t really want to re-apply this whole process, do you?

Final Thoughts

Here’s the kicker for me: I’ve had this work just fine for stacks and single switches alone, and fail on stacks and single switches alone — I can’t find the common denominator here. Perhaps there’s a hardware build that has this more than others, but I can’t figure it out. The official documentation doesn’t hint on a best practice for this (other than maintenance hours), so I’m uncertain on the best approach.

(Update) Juniper does have an official bug report for this, and is apparently fixed in 15.1X53-D592, but I had the issue on 18.2R3, so I’m not convinced it isn’t resolved yet.

Here’s some ideas I have to change my PoE firmware upgrade procedure (unsure if this will help):

  • Turning off PoE on all interfaces
  • Upgrading one at a time.
  • Trying an earlier version of the JTAC software, the going to the latest recommended. Example: I had no problems with 15.1X53-D59.4 or 15.1X53-D590, but the sample size for determining that is small (only two stacks attempted).
  • Update: I can’t find any rhyme or reason, TBH. I’ve had it fail multiple ways, so not sure the above will help.
  • Update 2: I have had some success with the following (but I don’t feel that confident about it yet):
    • Use the 18.2 branch
    • Upgrade one at a time
    • Waiting for a period of time after a software upgrade and reboot. Don’t get upgrade-happy. Give the hardware some time to get back up and going.
    • Cross your fingers. And legs. On a full moon.
  • Update 2: If you have a controller showing DEVICE FAIL, I’ve had success fixing it just by running:
    request system firmware upgrade poe fpc-slot 1 file /usr/libdata/poe_latest.s19 (change fpc-slot # accordingly)

Time will tell.

Hope this helps! If it doesn’t I’d love to know the different experiences others have. Please share if you’ve had success or failures with any of this!

* I swear I saw a message that a reboot is required, but I can’t confirm this (I didn’t screencap it)

** There is a version 3.4.8.0.26, but that’s on the 18.x software version line, and it requires a whole different set of upgrade procedures. This is outside the scope of this post.

SCCM Peer Cache: When Reversing It Doesn’t Reverse It

(Note: For some reason I wrote this up in December 2017 and never published it. Maybe I forgot to add some links, but I put the work in and it seems to still be relevant. As noted in the bottom, this should have been resolved in 1802.)

Last week I had some SCCM woes with the peer cache feature, the gist of which is that application install steps during OSD would effectively stall out. Why? That was the great mystery that had me sweating overcaffinated bullets as people out in the field are notifying me and my boss that they can’t image, and of course at a time when certain important devices need to be imaged.

“Why in the world is this not working?” I asked myself. I can only presume it was the result of me enabling the feature across our organization, but there’s more to the story than that.

I know what you’re saying: “Did you freaking test it before deploying it?

Of course I did. I had spent the last few months testing BranchCache and Peer Cache in a lab setup and then in a local site. They both were working well, and I had no indications that either was causing a problem. In fact, I was able to measure noticeable improvements in application and software update delivery as a result of enabling the changes! However, I never had an issue with OSD in my lab or at the site I tested, and so I had no idea to expect it.

What I encountered in CAS.log during OSD was this on all the affected machines:

<![LOG[   Matching DP location found 0 - https://machine1.contoso.org:8003/sccm_branchcache$/content_87fa3d3b-4e22-4378-928e-fe79b2852a4f (Locality: ADSITEPEER)]LOG]!><time="17:07:20.657+360" date="11-02-2017" component="ContentAccess" context="" type="1" thread="3804" file="downloadcontentrequest.cpp:1020">
<![LOG[   Matching DP location found 1 - https://machine2.contoso.org:8003/sccm_branchcache$/content_87fa3d3b-4e22-4378-928e-fe79b2852a4f (Locality: ADSITEPEER)]LOG]!><time="17:07:20.657+360" date="11-02-2017" component="ContentAccess" context="" type="1" thread="3804" file="downloadcontentrequest.cpp:1020">
<![LOG[   Matching DP location found 2 - http://dp02.contoso.org/sms_dp_smspkg$/content_87fa3d3b-4e22-4378-928e-fe79b2852a4f.1 (Locality: ADSITE)]LOG]!><time="17:07:20.657+360" date="11-02-2017" component="ContentAccess" context="" type="1" thread="3804" file="downloadcontentrequest.cpp:1020">

And quite a bit more than that, but this is what peer caching is supposed to do. It effectively creates a bunch of mini-DPs across your boundary group, but there’s one problem that I didn’t take into consideration, and it’s why my environment that I tested in didn’t have this problem but the problem appeared in production: we have a TON, and I mean a TON, of laptops, and those laptops are mostly in carts powered off or (hopefully) sleeping. So peer caching may not work for us.

But then why didn’t the distribution point take over? Why didn’t the client download from it? No idea, but I needed to move on, fast.

After seeing those logs (note the name of the URL has “BranchCache” in it, but it’s actually peer cache, but I didn’t know this at the time) and knowing the change I made recently, I figured I’ll just reverse the changes and it’ll be all good, right?

Thumbs Up.
We got this. We’ll just reverse the changes.

Wrong.

Well then what the hell is going on?

What the hell?

Feeling even more under the gun now that I’m completely baffled with what’s happening, I engage with Microsoft Premier support because I feel that I could keep plugging away and googling the problem to death, or I could cut to the chase and get Microsoft involved.

Microsoft gets in touch with me, and after going over all the information I sent them and looking over the logs I was noticing, the tech fairly quickly identifies the issue as being a problem with the current build of peer cache (as of 2018.11.01-ish). Apparently even though peer cache is disabled in client policy, the changes don’t actually work and the database in SCCM still contains all the super peer entries. The fix that resolved it was to delete the super peers out of the DB with these SQL query/commands:

delete from SuperPeers

delete from SuperPeerContentMap

Bam! The problem was solved. Mostly. Kind of. The tech thought OSD was working, so it must be fixed.

The problem though is that the database keeps getting full of super peer information, so it needs to be routinely cleared out, and the super per clients need to update their super peer state. So after following these two blogs, and then getting annoyed with cleaning the DB manually and updating the collection, I put together this crude script as a scheduled task to take care of it.

(Edit 20180525): To run this script, you’ll need a few prereqs:

  • PowerShell 5.1. This was tested running on that version. You can find your version by typing $PSVersionTable in a PowerShell terminal. This may work on earlier versions, but I never tested this on earlier versions.
  • SCCM Admin console installed on the machine you’ll run this from.
  • You need the SQLServer module installed. Assuming you’re on PowerShell 5.1, you can get it by just running ‘Install-Module SQLServer’, then import it in with ‘Import-SQLServer’.
  • Finally, you’ll need to adjust the script for your own local information (site code, servers, etc.)

(Edit2 20180529): After reading this over again, it might be helpful if I explain what my script does, at least a high-level. The comments in the code explains what it does at a line-by-line level. What the script below does:

  • Imports modules needed (SCCM and SQL)
  • Reads superPeers.txt and performs a SQL query to get current Super Peers, then concatenates both ingests
  • Creates a SCCM collection based on the resourceIDs that we just ingested
  • Invokes a client update notification telling the Super Peers to update their client policies
  • Keeps a list of all resourceIDs used for this process
  • Deletes the Super Peers and Super Peers mappings from the database

The basic idea is to get these various devices out there to update themselves and to clear them out of the database, otherwise other devices may try to still use them as Super Peer/mini-DP.

Next, what I’ve done is run this script in an elevated prompt, and then let it do it’s thing.

Script:

# Set Date for future use
$date = Get-Date -Format yyyyMMdd.HHmm

# Import ConfigMgr Conosle Module
Import-Module "$($ENV:SMS_ADMIN_UI_PATH)\..\ConfigurationManager.psd1" # Import the ConfigurationManager.psd1 module 

# Import SQLServer Module (Forgot this, thank you RiDER)
Import-Module SQLServer

# Starting transcript to keep track of what the heck is going on
Start-Transcript -Path "<path to file>\superPeerCacheCleanup\superPeerLog_($date).txt"

# Setting global 'WhatIf' and 'Verbose' parameters for testing or output
$WhatIfPreference = $false
$VerbosePreference = "Continue"

# Collection name that will contain peers
$collectionName = "Super Peers"

# Getting contents of text file that already contains Super Peers that we've already queried for
$superPeers = Get-Content "<path to file>\superPeerCacheCleanup\superPeers.txt"
# Run SQL query to get the resourceIDs of the Super Peers, and adding a comma to the end of resourceID gathered
$resourceIDS = (Invoke-Sqlcmd -Query "select * from SuperPeers" -ServerInstance "localhost" -Database "<SCCM DB>" | select resourceId -ExpandProperty resourceid) -join ","

# Combine the contents of the Super Peer text file and SQL query into an array
$newResourceIDS = $superPeers + "," + $resourceIDS

# Create the query rule that we'll use to indicate the membership for the SCCM collection
# This query sets the membership based on the resourceIDs that we gathered and concatenated earlier
$collectionQueryRule = "select SMS_R_SYSTEM.ResourceID,SMS_R_SYSTEM.ResourceType,SMS_R_SYSTEM.Name,SMS_R_SYSTEM.SMSUniqueIdentifier,SMS_R_SYSTEM.ResourceDomainORWorkgroup,SMS_R_SYSTEM.Client `
from SMS_R_System where SMS_R_System.ResourceId in (" + $newResourceIDS + ") order by SMS_R_System.Name"

# Set the PSPath Site Code Location. This is needed because running the SQL query changes the path to 'SQLSERVER'
# Probably a better way of doing this, but this works for this purpose
Set-Location "<SITECODE>:"

# Capture the collection query rule into a variable. I couldn't get the pipe to work correctly for removing the rule
# so I'm just capturing it as a variable.
$membershipRule = Get-CMCollectionQueryMembershipRule -CollectionName $collectionName

# Remove the collection query membership rule in order to create and update the collection with a new one
Remove-CMCollectionQueryMembershipRule -CollectionName $collectionName -RuleName $membershipRule.RuleName -Confirm:$false -force

# Updating the colection with the new query membership rule that we create above
Add-CMDeviceCollectionQueryMembershipRule -CollectionName $collectionName -RuleName "Super Peers $($date)" -QueryExpression $collectionQueryRule -Confirm:$false

# Tell SCCM to update the membership of the SCCM collection
Invoke-CMCollectionUpdate -Name $collectionName

# Pausing for a moment to allow SCCM to update the membership of the collection. This is an arbitrary time; could be shorter/longer.
Start-Sleep -Seconds 60

# Creating a backup of the old Super Peer list
Copy-Item "<path to file>\superPeerCacheCleanup\superPeers.txt" "<path to file>\superPeerCacheCleanup\superPeersOld.txt" -Force
# Deleting the super peer list. 
Remove-Item "<path to file>\superPeerCacheCleanup\superPeers.txt" -Force
# Creating a new Super Peer list based on combining the old values and new from the SQL query
Add-Content -Value $newResourceIDS -Path "<path to file>\superPeerCacheCleanup\superPeers.txt" -Force

# Sending a client notification in order to tell the new Super Peer clients to run the Super Peer state script 
Invoke-CMClientNotification -DeviceCollectionName "Super Peers" -NotificationType RequestMachinePolicyNow

# Deleting the Super Peer values from the SCCM DB
Invoke-Sqlcmd -Query "delete from SuperPeers" -ServerInstance "localhost" -Database "CM_PRI"
Invoke-Sqlcmd -Query "delete from SuperPeerContentMap" -ServerInstance "localhost" -Database "CM_PRI"

# Ending the transcript
Stop-Transcript

Update: As of December 2017, the issue still persisted, which might have been because the clients weren’t getting their client policies updated, so the Microsoft tech had me recreated some of the client policies and deploy them. The issue seems to have been fixed as those dang laptops start getting powered on. The tech also informed me that this behavior is resolved in SCCM 1802.

Also, I suspect that the issue was not only due to laptops becoming superpeers and not being powered on, but also because the boundary groups configured were too broad and spanned too many sites. Not the primary issue, but it definitely contributed to it.

We have continued to use BranchCache and it’s amazing how well BranchCache is working in our organization, even with a ton laptops in carts (45-53% of content source comes from BranchCache at these sites).

AudioCodes Mediant 1000 One-Way Outbound Audio on SIP Trunk

Had a strange issue recently when I was setting up a SIP trunk between two Mediant 1000s (M1K for shorthand). The SIP trunk was causing one-way audio issues in which I could receive media/RTP from the other side, but from the new M1K, I wasn’t sending any RTP packets whatsoever. It was the most odd thing because this SIP trunk didn’t have anything special about it since it was within a secure layer 2 network (no auth, no TLS).

I had to engage AudioCodes about the issue because I was completely puzzled. This isn’t complicated (relatively speaking); point the SIP trunk to the next hop, and assuming the network configuration is correct, there shouldn’t be an issue. When you did a Wireshark capture, it showed SIP traffic, but no RTP whatsoever:

audiocodesm1k_nortpout

After going through the initial process of getting the usual responses from AudioCodes to adjust IP profile, adjust this, adjust other things that I’ve already done or are non-consequential to the issue I’m having, they finally set a remote support session.

Within minutes, the tech identified the issue.

The network card that you purchase from AudioCodes comes with four ethernet ports, and those are configured in two-pairs for redundancy, which in my case was GE_7_1 and GE_7_2 as one pair, GE_7_3 and GE_7_4 as another pair. In my situation I reconfigured port 7_1 and 7_2 to be independent ports operating in what AudioCodes calls ‘Single’ mode.

Here’s the problem: in version 6.8 of the M1K software, you can configure the ports to operate this way in the GUI, but the software doesn’t actually support this function.

Why would the software allow you to configure it one way, but not support it in the back end? No idea. I’ll chalk it up to the same reason why you can use the ‘Search’ button on the top left, find settings that you actually don’t have support for and can’t find by just clicking around, configure those settings, and those settings won’t actually work.

audiocodessearchbutton

Anyways, here’s the solution: you can either stick with 6.8 and just move the ethernet group to use GE_7_3 (or any other odd-numbered interface on a network card), or upgrade to 7.0 that actually supports this configuration.

My configuration ended up looking something like this:

audiocodesethernetgroups

Hope that helps someone out there.