Quickie: Importing Certificate Into Juniper Devices

Working in a Juniper SRX (or other model), you might have a need to secure the web interface with a certificate through the CLI. I had this need and ran into a problem where Junos wouldn’t recognize the input I gave in the CLI for the certificate (it was an issue with line breaks). The web management service wasn’t starting and I was receiving errors like the following in the httpd.log file:

httpd: Error: OpenSSL: Can't open certificate file: /var/etc/ssl/https.pem
httpd: Error: OpenSSL: Can't configure certificates

Searching online, there isn’t much that talks about this process, so this is an attempt to rectify that. The following is a quick breakdown of how to import a certificate into a Juniper SRX via the CLI. The process should be applicable for all Juniper devices (EX, MX, etc.), but I’ve only tested it on SRXs in 15.x+.

Generate Certificate

First off, generate a certificate. I’m not going into the details of how to generate a certificate because that’s outside the scope of this post, and your certificate process will vary.

For this process, I generate certificates outside the Juniper device with some scripts, so no need to create a CSR on the Juniper device and so forth. Typically I use a 2048 to 4096-bit key, and I like to create SAN/UCC certs for these device types so that I can include the hostname, FQDN, and IP address.

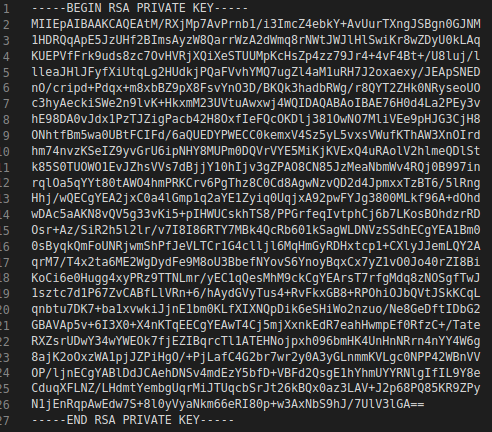
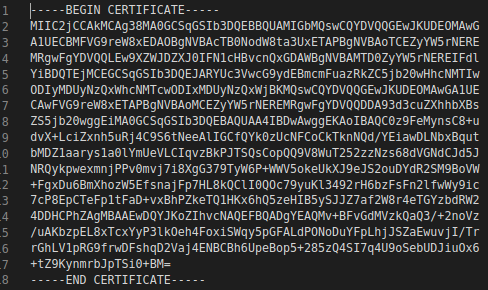
One important item here to note: your certificate format needs to be in base64/PEM format. In other words, it should be a file that looks something like this:

Example text output of base64/pem certificate.

And your unencrypted private key like this:

Example text output of RSA private key

Combine Private Key and Certificate Into Single Line

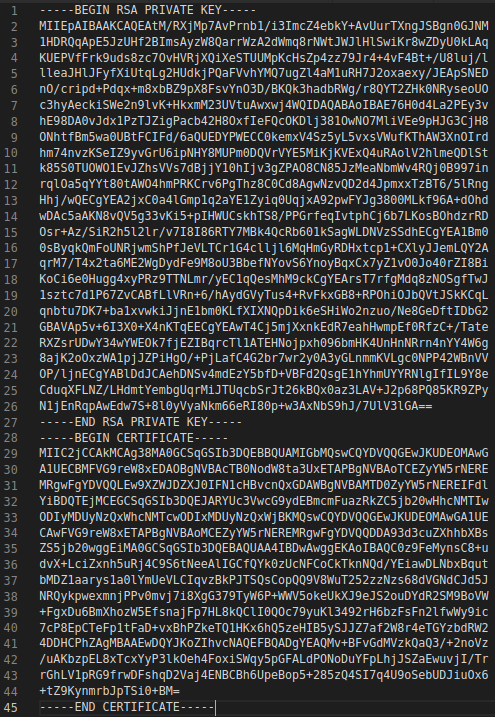
Next, I open up VS Code and concatenate the private key and certificate into one file:

Example of RSA private key and certificate as one file

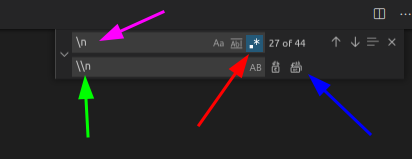
Now we’re going to replace all the line breaks with line breaks that Junos recognizes. Using below for reference, hit Ctrl+F (Find) or Ctrl+H (Replace) to get the find and replace box and click the drop-down arrow. Next switch to using regex (red arrow), then type ‘\n’ in the search field (pink arrow), type ‘\\n’ in the replace field (green arrow), and then click ‘Replace All’ button (blue arrow).

Example of using find and replace in VS Code

The end result should look something like this:

Example of RSA private key and certificate as a single line

Configure Certificate in Junos

To import configure the certificate in Junos, just copy the single line you created above then in configuration mode, enter the set command like below (with your single-line in-between the quotes):

set security certificates local <Junos Name for Cert> "<Transformed Private Key and Certificate>"

Example:

set security certificates local EXAMPLE-CERT-NAME "-----BEGIN RSA PRIVATE KEY-----\nMIIEpAIBAAKCAQEAtM/RXjMp7AvPrnb1/i3ImcZ4ebkY+AvUurTXngJSBgn0GJNM\n1HDRQqApE5JzUHf2BImsAyzW8QarrWzA2dWmq8rNWtJWJlHlSwiKr8wZDyU0kLAq\nKUEPVfFrk9uds8zc7OvHVRjXQiXeSTUUMpKcHsZp4zz79Jr4+4vF4Bt+/U8luj/l\nlleaJHlJFyfXiUtqLg2HUdkjPQaFVvhYMQ7ugZl4aM1uRH7J2oxaexy/JEApSNED\nnO/cripd+Pdqx+m8xbBZ9pX8FsvYnO3D/BKQk3hadbRWg/r8QYT2ZHk0NRyseoUO\nc3hyAeckiSWe2n9lvK+HkxmM23UVtuAwxwj4WQIDAQABAoIBAE76H0d4La2PEy3v\nhE98DA0vJdx1PzTJZigPacb42H8OxfIeFQcOKDlj381OwNO7MliVEe9pHJG3CjH8\nONhtfBm5wa0UBtFCIFd/6aQUEDYPWECC0kemxV4Sz5yL5vxsVWufKThAW3XnOIrd\nhm74nvzKSeIZ9yvGrU6ipNHY8MUPm0DQVrVYE5MiKjKVExQ4uRAolV2hlmeQDlSt\nk85S0TUOWO1EvJZhsVVs7dBjjY10hIjv3gZPAO8CN85JzMeaNbmWv4RQj0B997in\nrqlOa5qYYt80tAWO4hmPRKCrv6PgThz8C0Cd8AgwNzvQD2d4JpmxxTzBT6/5lRng\nHhj/wQECgYEA2jxC0a4lGmp1q2aYE1Zyiq0UqjxA92pwFYJg3800MLkf96A+dOhd\nwDAc5aAKN8vQV5g33vKi5+pIHWUCskhTS8/PPGrfeqIvtphCj6b7LKosBOhdzrRD\nOsr+Az/SiR2h5l2lr/v7I8I86RTY7MBk4QcRb601kSagWLDNVzSSdhECgYEA1Bm0\n0sByqkQmFoUNRjwmShPfJeVLTCr1G4clljl6MqHmGyRDHxtcp1+CXlyJJemLQY2A\nqrM7/T4x2ta6ME2WgDydFe9M8oU3BbefNYovS6YnoyBqxCx7yZ1vO0Jo40rZI8Bi\nKoCi6e0Hugg4xyPRz9TTNLmr/yEC1qQesMhM9ckCgYEArsT7rfgMdq8zNOSgfTwJ\n1sztc7d1P67ZvCABfLlVRn+6/hAydGVyTus4+RvFkxGB8+RPOhiOJbQVtJSkKCqL\nqnbtu7DK7+ba1xvwkiJjnE1bm0KLfXIXNQpDik6eSHiWo2nzuo/Ne8GeDftIDbG2\nGBAVAp5v+6I3X0+X4nKTqEECgYEAwT4Cj5mjXxnkEdR7eahHwmpEf0RfzC+/Tate\nRXZsrUDwY34wYWEOk7fjEZIBqrcTl1ATEHNojpxh096bmHK4UnHnNRrn4nYY4W6g\n8ajK2oOxzWA1pjJZPiHgO/+PjLafC4G2br7wr2y0A3yGLnmmKVLgc0NPP42WBnVV\nOP/ljnECgYABlDdJCAehDNSv4mdEzY5bfD+VBFd2QsgE1hYhmUYYRNlgIfIL9Y8e\nCduqXFLNZ/LHdmtYembgUqrMiJTUqcbSrJt26kBQx0az3LAV+J2p68PQ85KR9ZPy\nN1jEnRqpAwEdw7S+8l0yVyaNkm66eRI80p+w3AxNbS9hJ/7UlV3lGA==\n-----END RSA PRIVATE KEY-----\n-----BEGIN CERTIFICATE-----\nMIIC2jCCAkMCAg38MA0GCSqGSIb3DQEBBQUAMIGbMQswCQYDVQQGEwJKUDEOMAwG\nA1UECBMFVG9reW8xEDAOBgNVBAcTB0NodW8ta3UxETAPBgNVBAoTCEZyYW5rNERE\nMRgwFgYDVQQLEw9XZWJDZXJ0IFN1cHBvcnQxGDAWBgNVBAMTD0ZyYW5rNEREIFdl\nYiBDQTEjMCEGCSqGSIb3DQEJARYUc3VwcG9ydEBmcmFuazRkZC5jb20wHhcNMTIw\nODIyMDUyNzQxWhcNMTcwODIxMDUyNzQxWjBKMQswCQYDVQQGEwJKUDEOMAwGA1UE\nCAwFVG9reW8xETAPBgNVBAoMCEZyYW5rNEREMRgwFgYDVQQDDA93d3cuZXhhbXBs\nZS5jb20wggEiMA0GCSqGSIb3DQEBAQUAA4IBDwAwggEKAoIBAQC0z9FeMynsC8+u\ndvX+LciZxnh5uRj4C9S6tNeeAlIGCfQYk0zUcNFCoCkTknNQd/YEiawDLNbxBqut\nbMDZ1aarys1a0lYmUeVLCIqvzBkPJTSQsCopQQ9V8WuT252zzNzs68dVGNdCJd5J\nNRQykpwexmnjPPv0mvj7i8XgG379TyW6P+WWV5okeUkXJ9eJS2ouDYdR2SM9BoVW\n+FgxDu6BmXhozW5EfsnajFp7HL8kQClI0QOc79yuKl3492rH6bzFsFn2lfwWy9ic\n7cP8EpCTeFp1tFaD+vxBhPZkeTQ1HKx6hQ5zeHIB5ySJJZ7af2W8r4eTGYzbdRW2\n4DDHCPhZAgMBAAEwDQYJKoZIhvcNAQEFBQADgYEAQMv+BFvGdMVzkQaQ3/+2noVz\n/uAKbzpEL8xTcxYyP3lkOeh4FoxiSWqy5pGFALdPONoDuYFpLhjJSZaEwuvjI/Tr\nrGhLV1pRG9frwDFshqD2Vaj4ENBCBh6UpeBop5+285zQ4SI7q4U9oSebUDJiuOx6\n+tZ9KynmrbJpTSi0+BM=\n-----END CERTIFICATE-----"

Commit the config and you’re set.

Optional: Set the Certificate in Web Management

If you haven’t set a certificate yet for the web-management service, the command below will configure it with the certificate name you used:

set system services web-management local-certificate EXAMPLE-CERT-NAME

Optional: Restart Web Management

As a general practice from managing Linux boxes, I like to restart the web management service. In operational mode, run the following to restart the web-management service:

restart web-management

That’s it! You should be set.

Monitor or View Log Files

If you want, you can look at the httpd.log file to watch the process:

monitor start httpd.log #monitors log file

or

show log httpd.log
 

Palo Alto GlobalProtect Issue: Split Tunnel VPN with Skype for Business

There was a weird issue when I first joined my current job: I was told was that because of the way Palo Alto GlobalProtect (GP) and Microsoft Skype for Business (SfB) works (or maybe was configured?), I needed to log-in to SfB first, then connect to the GP VPN. The rationale was that SfB wouldn’t connect, or it would take a long time to connect, AND THEN even after a period of time, SfB would start behaving weird and it’s Exchange connectivity would drop, so SfB wouldn’t get voicemails, missed calls, etc. Just all out weirdness going on. It’s 2020, so maybe some of this true to form for the year, but probably not.

Palo Alto GlobalProtect Skype for Business

Click here if you want to skip the context and go to the solution.

Uh…Skype for Business?

Full stop. I’m sure you’re asking yourself right now, “Why not just migrate to Microsoft Teams? Get rid of that whole on-premises stuff.”

Let me answer that in a meme:

Sean Beam Boromir Meme: One does not simply migrate from Skype for Business to Teams

Skype for Business is one of the integrative technologies that spans lots of technology stacks that isn’t exactly easy to just jump ship from, and Teams as a VoIP replacement is arguably not there yet.

Also, have you seen the UI comparisons? Going from a sleek floating window for calling, IM, and conferencing with SfB to the giant-lets-pack-lots-of-services-into-one-large-window that is Teams is kind of a hard sell on the user training side of things. Maybe I’m biased. Maybe, but I digress.

The Challenge

Ok, back to the GlobalProtect and Skype for Business issues.

I was admittedly puzzled that the solution — to instruct users to sign-in to SfB before they sign-in to the VPN — was the best solution; it doesn’t seem right from a user experience perspective, and then when you toss-in the sudden weird issues with Exchange connectivity, none of this seemed right, and I doubt that’s the ideal experience. So I brought this up and the team basically said, “we just haven’t had time to troubleshoot it, but if you want to figure it out, go for it.”

You know what that sounds like? An adventure. An itch to itch. Something to solve. A challenge! There could be only one response:

Challenge Accepted Meme

Why Split Tunnel Skype for Business?

Something you might be asking is “Why configure split tunnel in the first place? Isn’t split tunneling a headache to manage?”

Split tunneling can definitely be a PITA, but like a million IT questions out there, the answer ultimately to this is, “it depends.” From my experience, split tunneling becomes difficult when you have a lot of split tunneling to manage, but if you have one or two services, it’s not that bad.

For Skype for Business, it’s one of those technologies that is sensitive to jitter, latency, and packet loss. Why? It’s because it’s voice traffic, and just like voice traffic on the inside of the network, where there’s jitter, latency, and/or packet loss, users on opposite ends of calls/conferences will experience this as delayed audio or parts of the conversation will just break up and it leads to an overall poor experience.

When you configure split tunneling, particularly for technologies like SfB, you avoid the dual encryption scenarios and you allow the technology to use its own optimized methods for connecting voice and application traffic by letting the software connect to services over the internet directly versus through a tunnel.

Baseline

That said, what’s the baseline here? How is GlobalProtect configured with split tunneling and what issues are there?

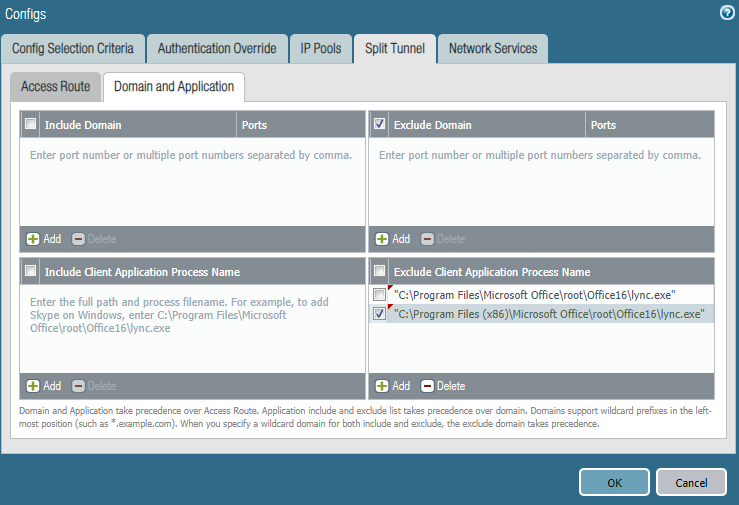
For GlobalProtect, the split tunnel configuration was configured pretty much like this documentation from Palo Alto (using just the application split tunnel, nothing else). It looked like this:

GlobalProtect Split Tunnel Domain and Application Tab Showing Excluded lync.exe

Here are the issues that were encountered in this setup:

  1. Connectivity issues if connecting SfB after GP VPN is connected
  2. Exchange connectivity in the SfB client drops after a duration of time, even if connection is established before VPN connection
  3. Call transfers working inconsistently
  4. Application sharing working inconsistently
  5. Conference meetings working inconsistently

Issues 3-5 really came later because they were hard to pinpoint due to their inconsistency, but issues 1 and 2 brought some fast wins.

Let’s get to some solutions.

Solutions

Solution for 1 and 2: DNS. It’s always dns.

It’s kind of a joke, but DNS really does cause a lot of problems, and in a split tunnel configuration when you’ve split-tunnel the traffic by application, the application is still going to resolve addresses by the servers you specify in the GlobalProtect configuration. So if you haven’t changed DNS records, the application will split tunnel, but it will still try to connect to internal resources because that’s the records it has.

I don’t have a PCAP screenshot for this, but if you pull up Wireshark and look at the PCAPs for your network interface (non-GP interface), you’ll see attempts to get to SfB internal IP addresses that aren’t (typically) on your network, and thus services fail.

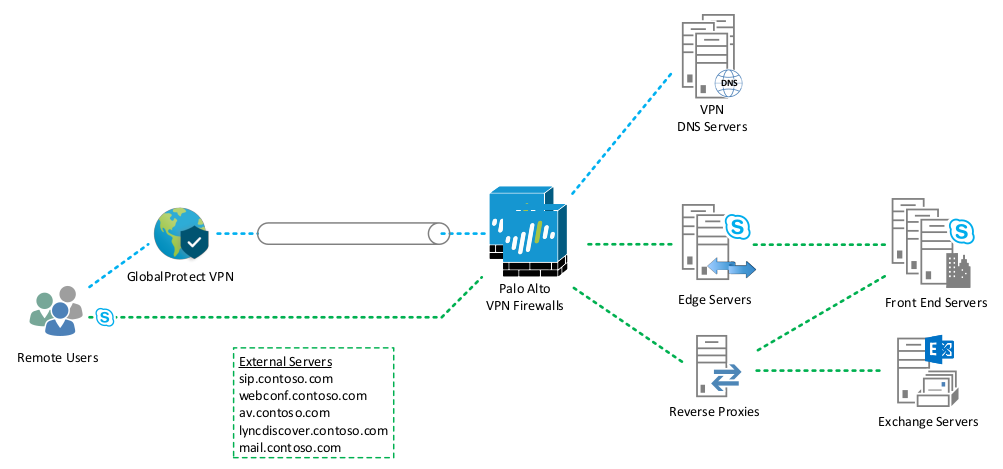
The solution is simple: for your VPN clients, serve the external IP addresses for A records being queried. I solved this by setting up dedicated DNS servers for VPN clients, then just creating the zones and root records for each FQDN. I did this for all the Skype for Business external IPs (edge and reverse proxy) and the external Exchange records.

After doing this, problems 1 and 2 went away because hostnames were being resolved correctly.

Solutions for 3 through 5: Firewall rules and IP Split Tunneling

Problems 3 through 5 were frustrating like no other because I couldn’t really narrow the problems down exactly. Some people had no problems with call transfers, application sharing, or conferencing, but then sometimes they would. So the thing to do is dig into the logs, and when I did I encountered a lot of this:

ms-diagnostics: 23;source="mediationServer.contoso.com";reason="Call failed to establish due to a media connectivity failure when one endpoint is internal and the other is remote"

Or

ms-diagnostics: 24;source="mediationServer.contoso.com";reason="Call failed to establish due to a media connectivity failure when both endpoints are remote"

Or even better:

ms-client-diagnostics: 52049; reason="Leaving app sharing because re-invite failed";UserType="Callee";MediaType="applicationsharing-video"

These all pointed to firewall issues, and even the ICEWARN messages noted something wrong with STUN, TURN, NAT, etc.

So I did some digging and found that firewall rules needed to be in-place to prevent VPN clients and internal SfB servers from communicating with one another. So I added some PAN policies, and things got better, but not perfect. Also, I added the external SfB IP addresses to the split tunnel in Network > GlobalProtect > Gateway > Agent > Client Settings > Client-Config > Split Tunnel > Exclude (which basically just adds static routes in the Windows routing table to send traffic for those IPs out the non-tunneled interface). Still the occasional error creeping up, and I could even witness it, but still can’t quite nail the problem.

Finally, I had a thought: why not get rid of the application process split tunnel? I mean, if I have DNS addreses configured, and IP split tunneling working, why is the application process split tunnel needed? Removed that from the setting and bam — all the problems went away. Like magic.

Shia Labeouf Magic

Here’s what the final outcome should look like for a GlobalProtect-Skype for Business-Exchange environment for split tunnel.

Palo Alto GlobalProtect Skype For Business Split Tunnel

Of course, I fully admit this is really more of a legacy design with everything on-premises, but you could just as easily send the Exchange traffic to Office 365 in the split tunnel.

Thoughts on GlobalProtect Application Process Split Tunnel

While I had configured the traditional methods of doing split tunnel configurations (IP split tunnel and DNS servers), I’m still a little puzzled to the fact that the Palo Alto GlobalProtect application process split tunnel seemed to cause issues. My guess is that something in the way the Skype for Business client is designed prevents the process from being completely split tunneled, and I think this has to do with the way Skype for Business operates with Windows.

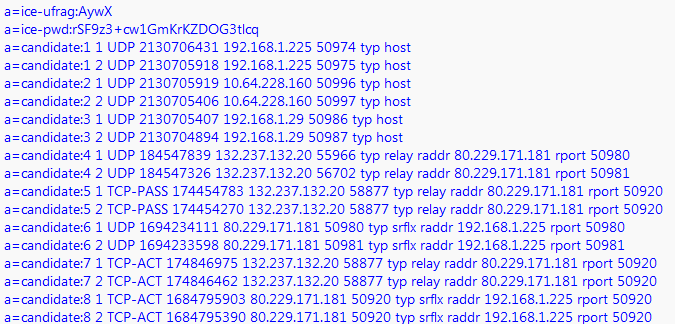
If you get really bored on a Friday night and have nothing better to do in life, check out some of these deep dives on candidate path selection and other stuff related to media flow. What you’ll see in the SfB client log files is something like this:

Skype for Business candidate selection
Credit

Basically, SfB gets a selection of candidates that it uses from the interfaces on the computer. In a GP split tunnel set up (with or without application process split tunnel configured), you’ll see ALL IP addresses (including the tunnel address) listed as candidates, and my suspicion is that Skype for Business still tries to use a tunnel interface, and sometimes it gets around the Palo Alto GlobalProtect application exclusion, and then that causes calls, application sharing, and even conferences to fail. I can’t show my own logs seeing this for security reasons, so you’ll have to trust me on that one.

Solution (tl;dr)

Here’s the quick solution for GlobalProtect and Skype for Business Split Tunnel

  1. Create separate DNS servers for VPN clients and create the specific Skype for Business DNS records needed, and configure them for external IP addresses so that Skype for Business resolves external addresses and configures itself appropriately.
  2. Create firewall rules that block traffic to/from the VPN network to internal Skype for Business and Exchange IP addresses. We want the SfB client to determine it can’t go inside for traffic.
  3. In Panorama or PANOS, under Network > GlobalProtect > Gateway > Agent > Client Settings > Client-Config > Split Tunnel > Exclude, configure all external SfB addresses so that the GP client doesn’t send traffic for those IPs through the tunnel. Alternatively, under Network > GlobalProtect > Gateway > Agent > Client Settings > Client-Config > Split Tunnel > Domain and Application > Exclude Domain, you could add the SfB external FQDNs (that said, IIRC, the stuff under ‘Domain and Application’ requires the GlobalProtect license…technically).

Links, Further Reading, Credit

Modding EX2200 PoE Switch with Quieter Fans

Since COVID-19 hit, I moved out to my garage so I could work from home, and in doing so I realized how loud my network rack really is. My rack is not the prettiest rack, and to be frank I’ve never really been a fan of the sleek LED lit home lab. My aesthetic is more like something from a Tatooine droid shop: not disorganized, per se, but certainly not pretty.

Watto's Shop

I’ve really been wanting a Juniper switch for home, so I went shopping on ebay to see if I could find anything, and surprisingly, right now you can find EX2200 switches for really cheap — like, $75 shipped. I wondered then if I could modify the fans on the switch, and lo and behold, you can! So I bought a Juniper PoE switch, but the next part was purchasing the fans.

I came across the video below from Christian Scholz showing mostly how to replace the fans. It’s an excellent video, and shows you how to replace the two back chassis fans.

However, it doesn’t show you how to replace the fans for the power supply, largely because the power supply on non-PoE EX2200s doesn’t have fans (see YouTube preview above).

For the fans on a PoE EX2200, there’s actually just one fan, and if you want to replace it with a Noctua fan, it’s going to work, but it’s going to get a bit warm. One solution is to add a fan on the exhaust port that draws the air out, but it’s going to require a little modification for the chassis cover.

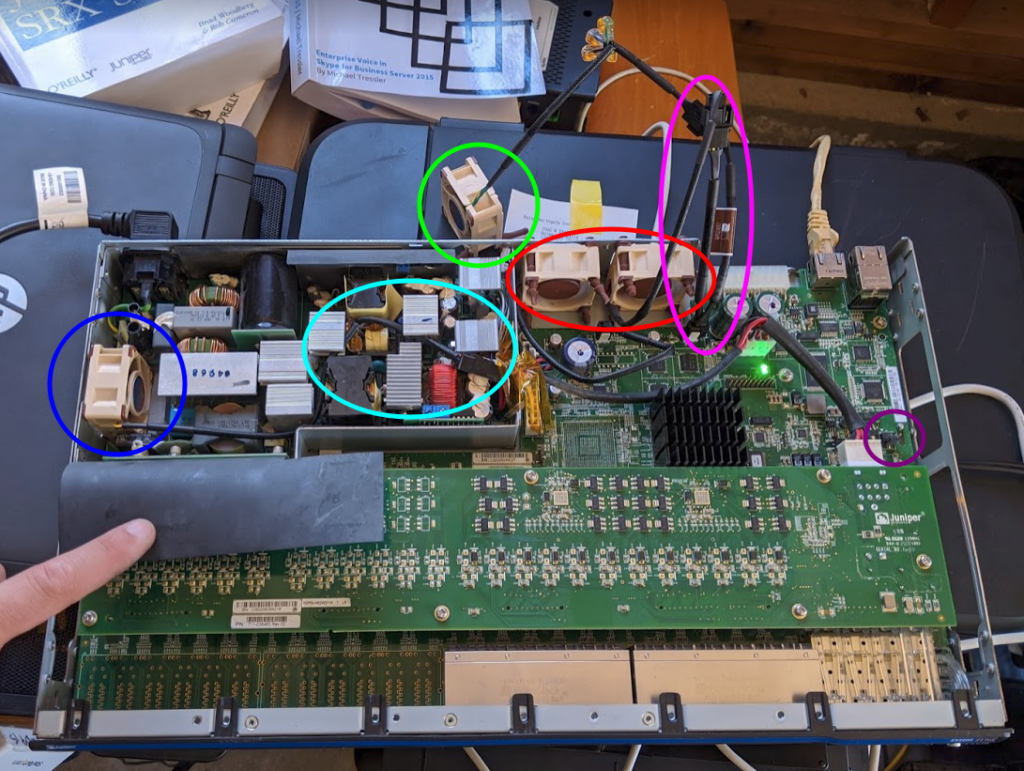
I’m going to briefly show what I did, but I didn’t think to take pictures during the process, but here’s a shot of what it looks like overall:

Uncovered EX2200 switch with fans added.

Backstory: I actually screwed up and got the wrong Noctua fan for the power supply fan. I thought it was a PWM for some reason, but it actually needed a FLX fan. However, I was able to still use the PWM fan. Here’s a breakdown of the above:

  • Blue – This is the power supply fan, a Noctua NF-A4x20 FLX fan.
  • Teal – This is a splice of the old cable adapter with the new using the Noctua omnijoin adapter set that comes with the fans (which is stupidly easy to use). Red and black wires matched up, and then I matched the yellow on the Noctua cable to the blue on the old fan plug.
  • Green – This is the Noctua NF-A4x20 PWM fan that mistakenly bought. The fan runs at 100% all the time, but not an issue. While a mistake, the fan came with…
  • Pink – Y-Adapter set that came with the PWM fan. I was able to plug this into the power plug port for the right FLX rear chassis fan (red), then plug that fan into the main y-adapter and then the PWM into the other port.
  • Red – These are FLX fans.
  • Purple – This was a port labeled “J9” that tried to use for power, but didn’t work (hence why I used the y-adapter).

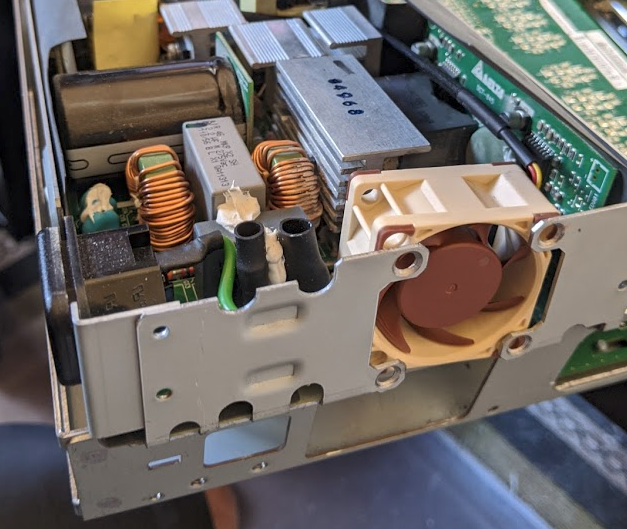
Some notes I learned. For one, you’ll need to lift the power supply up in order to unscrew the screws:

EX2200 power supply lifted out

I also had to drill a fairly large hole in the chassis cover so that I could fit the the cable in (see below). Had I not screwed up and spliced the PWM cable, the hole could have been smaller and I probably could have fit the y-adapter within the chassis.

EX2200 Fan backside

I had to also modify the chassis for the PoE exhaust port by flattening the metal screen (so the attached fan didn’t rub against it) and I had to drill two additional holes so that the silicon screws could hold the fan down.

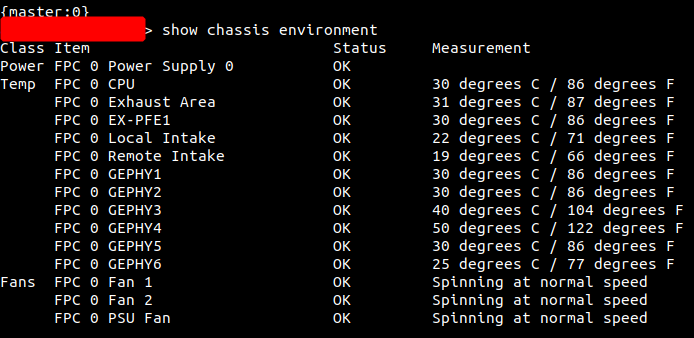
Finally, here’s a look from the CLI side:

EX2200 show chassis environment - Fans spinning normally

Final Thoughts

  • Overall, it’s working really well. It’s almost completely quiet — my EVE-NG server is actually louder than this thing.
  • It’s not pretty, but the ugliness is hidden in the back.
  • I DO NOT RECOMMEND YOU DO THIS TO PRODUCTION EQUIPMENT. I’m doing this to my home stuff, so I can live with it and the consequences, but I would never do this at work (too much work, TBH; better to buy an EX2300-C).
  • Screwing the chassis cover back on will indeed be a little tighter, but with a little force you can get all the screws on.
  • I don’t recommend using a drill to unscrew these (you can strip the screws pretty easily), but if you do, have a firm downward motion and screw/unscrew in bursts.
  • I used to loathe the EX2200s for how slow they are, but on the 12.3R12.4 software, they seem to work well.

Channelizing Ports: The Case of the Missing 1 Gbps Interfaces on EX4650 Switches

A few weeks ago while helping deploy a demo Juniper EX4650 aggregation/distribution layer switch, we ran into a problem where 1 Gbps interfaces would not function correctly; i.e., 1 Gbps interfaces were missing and wouldn’t appear on the EX4650s. The issue went something like this:

  • Plugged-in 1 Gbps SFP modules
  • Ran show chassis hardware and verified SFPs were installed
  • Ran show interface ge-0/0/4 to check out the interface but received “error: device ge-0/0/4 not found

Steve Brule Looking Confused

Huh? Come again?

Truth be told, we were using Cisco 1 Gbps SFPs on the switch, and not having any Juniper SFPs (we never have), we chalked up the issue to this being a newer switch and Juniper not capable of supporting non-Juniper SFPs. Thus we ordered Juniper SFPs, waited for them to ship to us, and then tried again — same result.

Steve Brule saying 'k'.

Fast forward an evening of troubleshooting and waiting for TAC to get involved, eventually a Juniper engineer gave us the solution: we needed to channelize our ports.

Channelizing Ports on Juniper EX4650s

First off, I recommend reading the documentation from Juniper on channelizing ports on EX4650s. It’s not required for what’s below, but if you want more information about it, I recommend reading up on it.

Trivia time! EX4650-48Y-8C switches are the same hardware as QFX5120-48Y-8C, just a different OS package!

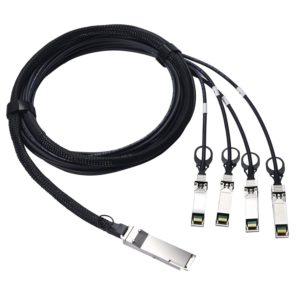
EX4650 switches come with 48 SFP+ ports that are capable of up to 25 Gbps ports, but come configured by default as 10 Gbps ports; they also come with 8 QSFP+ ports that are capable of up to 100 Gbps speeds, but can operate as 40 Gbps, or can be broken up individually into 4 channels of 25 Gbps (100 Gbps to 4-25 Gbps via breakout cables) or 4 channels of 10 Gbps (40 Gbps to 4-10 Gbps via breakout cables). Breaking them up would be done via a cable like this (there are multiple options for break out cables; this is just one) option:

Breakout cable - 1 40 Gbps QSFP+ module to 4 SFP+ 10 Gbps modules

If you’re not familiar with channelizing ports (I wasn’t until this), channelizing is the process of configuring interface ports to operate in different capacities. The most important thing to note about QFX5120 or EX4650 switches is that the QSFP+ uplink ports are the only ports that perform a process called auto-channelization, a process in which if you plug-in a module, the port will automatically switch between 100 Gbps and 40 Gbps (not sure if you plugged-in a 10 Gbps module if it would do this). If you wish to use the 25/10 Gbps break-out cables, you’ll need to disable auto-channelization and manually configure the ports to operate as such (that’s outside my scope here, but read the link above for more info).

Why this is so important for my issue is that on EX4650s, the 48 SFP+ ports do not perform auto-channelization! These ports, by default, come configured as 10 Gbps ports, and if you wish to use 1 or 25 Gbps modules, you have to manually configure the switches to perform this. This is exactly why the 1 Gbps modules were not appearing, because the ports were not configured to operate in 1G mode!

To configure the ports for the speed needed, here is the configuration we needed:

{master:0}[edit chassis]
jimmy@EX4650#
fpc 0 {
    pic 0 {
        port 0 {
            speed 1G;
        }
        port 4 {
            speed 1G;
        }
        port 8 {
            speed 25G;
        }
    }
}

Under the chassis > fpc 0 > pic 0 stanzas, we configured speeds for the ports. However, note that the ports configurations above are broken up every four ports; this is because for the 48 SFP+ ports, port speeds are configured in groups of four (quads), and each quad can be 1, 10, or 25 Gbps. Here’s a visual of the quads:

EX4650 Port Quads - every group of four ports are colored and labeled by the first port - Port 0, port 4, etc.
(Click to enlarge)
Each quad is colorized above (port/quad 0, 4, 8, 12, 16, 20, 24, 28, 32, 36, 40, 44)

Therefore, in order to configure 1 Gbps interfaces on an EX4650 switch (or a QFX5120 for that matter), you need to manually set the configuration speed in the chassis configuration.

Problem solved. And Bob’s your uncle.

Some additional items that I’ve discovered in this process:

  • Because the ports are configured in groups of 4, all four ports in a quad will be the same speed. You cannot configure port 1, for example, at a different speed. This makes me suspect that on the backplane side of things, each quad is really a 100 Gbps port of some kind, like the uplink ports on the right, but is channelized in some way on the backend. Maybe. Not sure. This post makes question that logic.
  • Like other EX series switches, non-Juniper copper 1 Gbps modules do not work. The copper modules must be Juniper (or Juniper-coded) SFPs.
  • Non-Juniper 1 Gbps optic modules do work correctly.
  • The eight uplink ports on the right are configured individually, not as quads.
  • Unlike older Juniper equipment, a system reboot is not required for changing port speeds.