(UPDATE 20190619: There are better instructions in a new post I made. Go there. Wireshark is actually built correctly and will even capture packets (unlike these instructions)).
(UPDATE 20190611: This method below is a bit clunky and causes quite a few issues that are unnecessary. I’ve found a new method that I’m going to make a new post for. Hint: in the Wireshark tarball, look at the ‘INSTALL’ file.)
If you’re doing packet analysis and run Debian/Ubuntu, you may have noticed that Wireshark is currently at version 3.0.2 (at the time of writing this), but both Debian and Ubuntu are running 2.6.x versions of Wireshark (Debian Stretch is at 2.6.7-1, and Ubuntu 18.04 is at 2.6.8-1). While Fedora 30 is running Wireshark 3.0.1, even Ubuntu 19.10 (Eoan) is still running Wireshark 2.6.9-1 (again at the time of writing this).
Now for probably really good reasons, there still isn’t a Wireshark 3.0.1 deb package for Debian-Ubuntu distributions, and if you just so happen to be at Sharkfest 2019 running some flavor of Debian/Ubuntu and you’re taking the packet analysis classes, you need to be running Wireshark 3.0.1. Of course, you could just fire up a VM on your laptop and run Windows, or grab that random spare Mac in your bag — why you have a spare Mac in your bag is beyond me — but your only option is to compile from source the Wireshark package.
I’m going to quit yapping about this now and just get to the point.
Compiling and Installing Wireshark 3.0.1 for Ubuntu 18.04
First off, Wireshark is a complicated application, and I am not a developer, so my instructions here are likely flawed. My main intent here is to just share the dependencies needed to get Wireshark 3.0.1 compiled because otherwise you’re going to be running the ninja/make commands, get the dependency error message, Google the dependency package for Ubuntu, install it, then find the next one over and over again — if only someone just posted the dependencies!
That being said, I work with Ubuntu LTS releases, so my instructions here are what I put together for Ubuntu 18.04 on a Ubuntu 18.04 laptop and in a Linux container in Crostini (this is the ‘Linux Apps’ service on Chromebooks, which is my primary device as of late and is a whole other post I hope to do some day).
These instructions are largely lifted from this post on ‘Beyond Linux from Scratch’, but I’ve appened them with dependency information for Ubuntu 18.04.
Another caveat here is that I previously had done an ‘apt install wireshark’, which helped with most of the libpcap depdencies. Ubuntu runs libpcap0.8 1.8.1-6*, but the ‘Beyond Linux’ post says it needs libpcap-1.9 (my install seems to capture fine with 0.8 1.8, but I’m not really capturing with this install, just analyzing).
Lastly, this doesn’t have option components. I’m just trying to get 3.0.1 up and running for the basics.
If there ways to improve this, please comment and let me know!
Install the dependencies
First off, let’s get the dependencies installed:
sudo apt install build-essential pkg-config ninja-build bison flex qt5-default qttools5-dev-tools qtcreator ninja-build libpcap-dev cmake libglib2.0-dev libgcrypt20-dev qttools5-dev qtmultimedia5-dev libqt5svg5-dev
Create the Wireshark Group and Add Yourself to the Group
To capture without running as root, create the ‘wireshark’ group (assuming gid 62 isn’t taken). Run the following as root/sudo:
groupadd -g 62 wireshark
Add yourself to the group (you’ll need to log out and back in for the change to go into effect) as root/sudo:
usermod -a -G wireshark <username>
Grab and Extract the Wireshark tarball
Grab the Wireshark tarball:
wget https://www.wireshark.org/download/src/all-versions/wireshark-3.0.1.tar.xz
Extract it and move into the directory:
tar xf wireshark-3.0.1.tar.xz
cd wireshark-3.0.1
Build the Wireshark Application
In the ‘wireshark-3.0.1’ directory, build the application for install:
mkdir build &&
cd build &&

cmake -DCMAKE_INSTALL_PREFIX=/usr \
-DCMAKE_BUILD_TYPE=Release \
-DCMAKE_INSTALL_DOCDIR=/usr/share/doc/wireshark-3.0.1 \
-G Ninja \
.. &&
ninja
Install the Built Wireshark Application
Now as root, install Wireshark:
ninja install &&

install -v -m755 -d /usr/share/doc/wireshark-3.0.1 &&
install -v -m644 ../README.linux ../doc/README.* ../doc/{*.pod,randpkt.txt} \
/usr/share/doc/wireshark-3.0.1 &&

pushd /usr/share/doc/wireshark-3.0.1 &&
for FILENAME in ../../wireshark/*.html; do
ln -s -v -f $FILENAME .
done &&
popd
unset FILENAME
Secure the Application Directories
Set ownership info of the applications:
chown -v root:wireshark /usr/bin/{tshark,dumpcap} &&
chmod -v 6550 /usr/bin/{tshark,dumpcap}
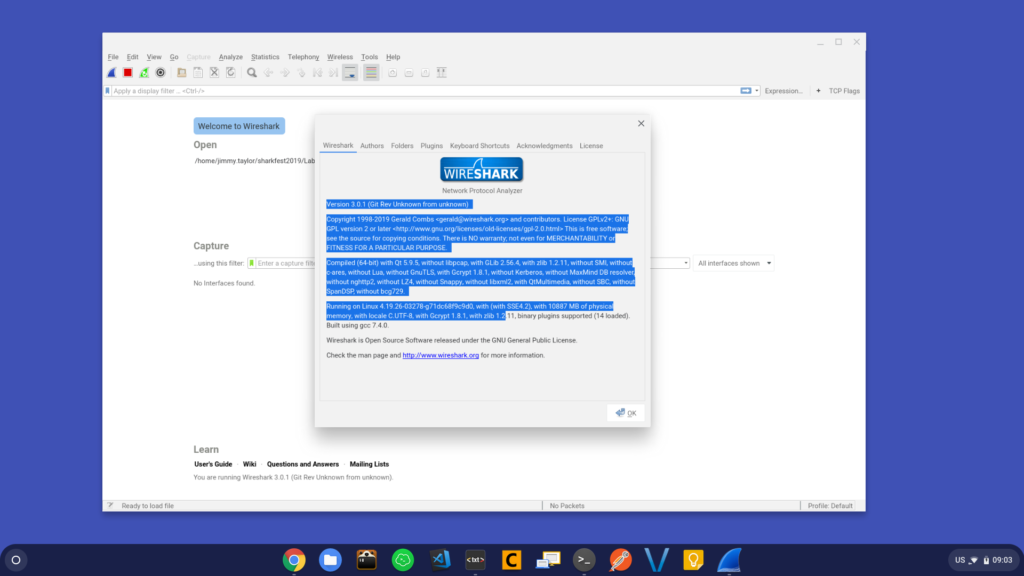
That should be it! Run ‘wireshark’ and you should be set. Should look something like this:

Bugs I’ve Encountered
Seems that on the Crostini build, some things aren’t working correctly. I’ve built this on my Ubuntu 18.04 laptop with no issues (yet). Some that I’ve found on Crostini:
- Interfaces not found for capturing: I’m not really concerned about this because I knew from the get-go that Wireshark with ChromeOS would be spotty, especially with Wireshark. However, if you use the official Ubuntu package, packet capture works fine (although because it’s containerized, you don’t get hardware access for capturing).
- No statistic information on interface: another one I don’t care about because I get the data elsewhere (see below).
Edit (20190610): I erroneously said that Ubuntu runs libpcap0.8, inferring that the version was 0.8, but Ubuntu actually runs 1.8.1-6. The Ubuntu libpcap package is called 0.8 and is built and tested for Ubuntu, but that name doesn’t actually reflect the actual version.
