tl;dr – Click here to go straight to the Python example.
The journey to automation and scripting is fraught with mental obstacles, and one concept I continued to not really comprehend in Python was the concept of threading, multiprocessing, and queuing.
![]()
Up until recently, I felt like I basically had my dunce cap on (relatively speaking, of course) and was restricted to sequential loops and connections — in other words, I was stuck in “for i in x” loop land and could only connect to one device at a time. In order to speed up my scripts and connect to multiple devices at once (using Netmiko, for example), the path to that is through queues, and threading/multiprocessing.
Ultimately I landed on threading instead of multiprocessing because when you’re connecting to devices/APIs over the network, you’re typically waiting for a remote host to process the request, and thus your CPU is sitting there ‘idle’ waiting. To quote a great blog post that breaks down threading versus multiprocessing:
“[t]hreading is game-changing because many scripts related to network/data I/O spend the majority of their time waiting for data from a remote source. Because downloads might not be linked (i.e., scraping separate websites), the processor can download from different data sources in parallel and combine the result at the end.” (source)
While the above link has some great examples, for some reason I still didn’t quite grasp the concept of threads and queues, even after trying the example of other approaches. Why? Well, sometimes we need different perspectives to a problem because we all learn differently, thus my hope here is to provide a different perspective to threading and connecting to multiple devices with Python.
Netmiko Using Threaded Queue
I don’t want to waste to much time, so let’s just cut to the chase and get to the script:I’m going to try a different approach here, so here’s an overly verbose perspective on how the script runs. It’s a step-by-step breakdown of how it processes. That said, as much as a I tried to describe the process in a linear manner, it’s not going to be perfect.
- Load and stage the modules and terminal messages relating to hitting ctrl+c. (lines 6-20)
- Load the global variables (lines 23-38)
- Prompt the user to securely enter a password (var:
password) (line 23) - Read a list of IP addresses from text file (vars:
ip_addrs_fileandip_addrs) (lines 26-27) - Set up the number of threads to spin up (var:
num_threads) (line 30) - Set up the global queue that we’ll use to set up a list of ip addresses to be processed later (var:
enclosure_queue) (line 32) - Set up an object that we’ll use to lock up the screen to print the contents of a thread so as to avoid having threads print over each other later (var:
print_lock) (line 34) - Set up the command you’ll want to run. This is a simple one command script for the purpose of the demo. (var:
command) (line 38)
- Prompt the user to securely enter a password (var:
- The two functions
deviceconnector()and andmain()get loaded and staged. (lines 41-107) - The main() function is called and begins the execution of the main components of the script (line 112)
- Loop through a number list (
num_threads), and for each number in that list (i): (line 92)- Load a thread that runs an instance of
deviceconnector()sending to the function the thread number (i) and the global queue (enclosure_queue) (line 95)deviceconnector()accepts the variablesiasi, andenclosure_queueasq(line 41)deviceconnector()starts an unendingwhileloop that: (line 45)- Attempts to acquire an IP address from the global queue (line 50)
- If there is no IP address in the queue, the while loop will be blocked and wait until there is an ip address in the queue
- Sets up dictionary for Netmiko (lines 54-59)
- Netmiko attempts to connect to the device (lines 52-53)
- If there is a time out, lock the process and print a time-out message, marking the queue item as processed and restarting the while loop (lines 55-58)
- If there is an authentication error, print an authentication error and exit the whole script (lines 70-73)
- Send command to the device, lock the process and print the output (lines 76-80)
- Disconnect from the device, mark the queue item as complete, and loop back (lines 83-86)
- Attempts to acquire an IP address from the global queue (line 50)
- Set the thread to run as a daemon/in the background (line 97)
- Start the thread (line 99)
- Load a thread that runs an instance of
- Loop through a list of IP addresses (
ip_addrs), and for each IP address (ip_addr) (lines 102-103)- Add the IP address (
ip_addr) to the global queue as an individual queue item to be processed (line 103)
- Add the IP address (
- Wait for all queue items to be processed before exiting the queue and script (line 106)
- Print a statement to the console indicating the script is complete (line 107)
- Loop through a number list (
Use this as you wish, and hope it’s helpful.
Credit and Additional Info
This was inspired by a few different blog posts, so here’s some additional info to follow:
- Multiprocessing Vs. Threading In Python: What You Need To Know.
A great breakdown of threading versus multiprocessing, and influential for some of the work I’m doing. - How to Make Python Wait
This one actually reignited my interest in figuring out how to use threading. It’s a good explanation of the different approaches to make a script wait in Python. - Queue – A thread-safe FIFO implementation
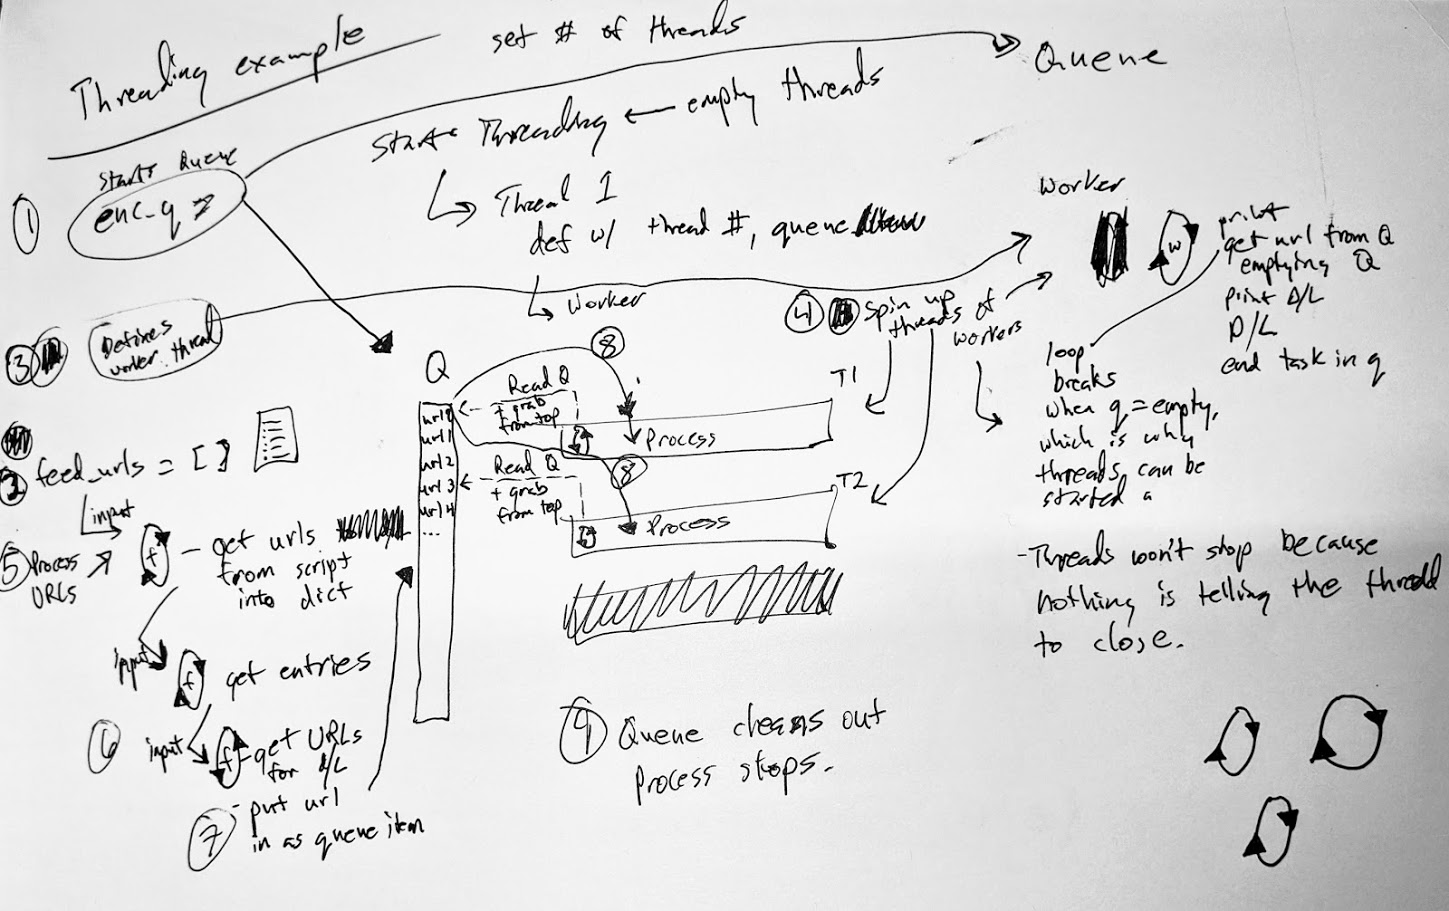
Although written in Python 2, this post helped me put everything together so I could understand what the heck is going on. Some of the code I used here, but refactored for Python 3. Below is a crude diagram I did to help me figure out what was going on with this post, and the circles with arrows indicate loops, with the ‘f’ in the middle meaning ‘for’ loops and ‘w’ meaning ‘while’ loops.