Installing 3rd-Party Certificates for Web Interfaces on Gigamon

You know what I don’t like? Cottage cheese. It’s gross.

Cottage Cheese

You know what else I don’t like?

This:

not secure https


And this:

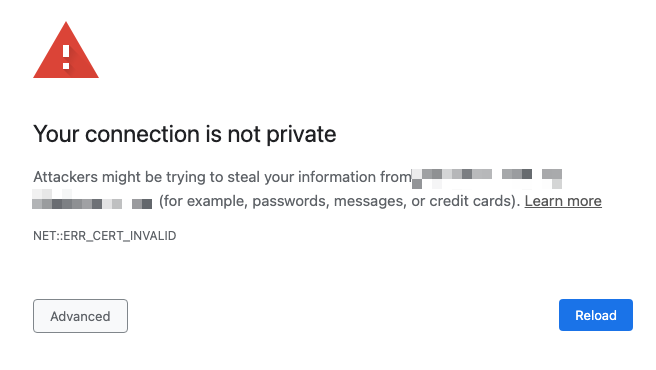
Your connection is not private


And this:

Red Vines Black Licorice


And this:

Cisco Smart Licensing


And yes, I just wasted a full page, maybe made you excessively scroll, made the readability scores upset, and I’m still not getting to my damn point.

Steve Brule Upset


My damn point: I don’t like managed devices that don’t have their web certificates updated, and I had Gigamon appliances that needed some certificate love so I’m jotting down here how to update the Gigamon certificates with externally generated ones.

“Why?” I hear you asking. Well, I don’t think Gigamon does a very good job explaining in their documentation how to update the certificates, so I’m going to do it here.

Googling Gigamon 3rd-Party Certificate Installation

Gigamon

If you try googling for any combination of the words “gigamon install web certificate”, you’re going to get a whole list of links that are not applicable to Gigamon appliances, and really are focused on the management platform GigaVue-FM.

Quick note: the documentation here for GigaVue-FM and the web certificate is accurate, but it’s at the bottom of the search results. So if you’re looking for GigaVue-FM documentation, there you go.

The reason you’re not finding anything related in the search results is because everything related to certificates and the web interface under the crypto commands (much like Cisco). The basic process then is to import the certificate, private key, certificate chain (root and issuing) using the crypto commands, then tell the web service to use the new certificate.

Configuring Gigamon Certificates

First off, for importing third-party certificates you can do it two ways: paste in the certificate/key information, or download it (“fetch”) from somewhere else.

# Copying in the content
(config) # crypto certificate name steveBruleCA public-cert pem "<contents of cert>"

# Downloading/Fetching the CA certificate
(config) # crypto certificate name steveBruleCA public-cert pem fetch http://consentfactory.com/steveBruleCA.crt

Quick Python Server

My preference is to spin up Python http server and download from that location real quick. Assuming you have Python installed, you can run the following:

# Spins up Python with default setting
python3 -m http.server

Which results in this:

Serving HTTP on 0.0.0.0 port 8000 (http://0.0.0.0:8000/) ...

Or run this:

# Spins up Python on default port 80, but you may need to run with elevated privileges since its a privileged port
python3 -m http.server 80

Which results in this:

Serving HTTP on 0.0.0.0 port 80 (http://0.0.0.0:80/) ...

First: Install You Certificate Authority Certificates

You may or may not need to do this. For me, I did. I’ll show both ways to do it, but from here out, I’ll just be fetching from my Python server.

# Copying in the content
(config) # crypto certificate name steveBruleCA public-cert pem "
> -----BEGIN CERTIFICATE-----
> MIIFVzCCAz+gAwIBAgINAgPlk28xsBNJiGuiFzANBgkqhkiG9w0BAQwFADBHMQsw
> CQYDVQQGEwJVUzEiMCAGA1UEChMZR29vZ2xlIFRydXN0IFNlcnZpY2VzIExMQzEU
> MBIGA1UEAxMLR1RTIFJvb3QgUjEwHhcNMTYwNjIyMDAwMDAwWhcNMzYwNjIyMDAw
> MDAwWjBHMQswCQYDVQQGEwJVUzEiMCAGA1UEChMZR29vZ2xlIFRydXN0IFNlcnZp
> Y2VzIExMQzEUMBIGA1UEAxMLR1RTIFJvb3QgUjEwggIiMA0GCSqGSIb3DQEBAQUA
> A4ICDwAwggIKAoICAQC2EQKLHuOhd5s73L+UPreVp0A8of2C+X0yBoJx9vaMf/vo
> 27xqLpeXo4xL+Sv2sfnOhB2x+cWX3u+58qPpvBKJXqeqUqv4IyfLpLGcY9vXmX7w
> Cl7raKb0xlpHDU0QM+NOsROjyBhsS+z8CZDfnWQpJSMHobTSPS5g4M/SCYe7zUjw
> TcLCeoiKu7rPWRnWr4+wB7CeMfGCwcDfLqZtbBkOtdh+JhpFAz2weaSUKK0Pfybl
> qAj+lug8aJRT7oM6iCsVlgmy4HqMLnXWnOunVmSPlk9orj2XwoSPwLxAwAtcvfaH
> szVsrBhQf4TgTM2S0yDpM7xSma8ytSmzJSq0SPly4cpk9+aCEI3oncKKiPo4Zor8
> Y/kB+Xj9e1x3+naH+uzfsQ55lVe0vSbv1gHR6xYKu44LtcXFilWr06zqkUspzBmk
> MiVOKvFlRNACzqrOSbTqn3yDsEB750Orp2yjj32JgfpMpf/VjsPOS+C12LOORc92
> wO1AK/1TD7Cn1TsNsYqiA94xrcx36m97PtbfkSIS5r762DL8EGMUUXLeXdYWk70p
> aDPvOmbsB4om3xPXV2V4J95eSRQAogB/mqghtqmxlbCluQ0WEdrHbEg8QOB+DVrN
> VjzRlwW5y0vtOUucxD/SVRNuJLDWcfr0wbrM7Rv1/oFB2ACYPTrIrnqYNxgFlQID
> AQABo0IwQDAOBgNVHQ8BAf8EBAMCAYYwDwYDVR0TAQH/BAUwAwEB/zAdBgNVHQ4E
> FgQU5K8rJnEaK0gnhS9SZizv8IkTcT4wDQYJKoZIhvcNAQEMBQADggIBAJ+qQibb
> C5u+/x6Wki4+omVKapi6Ist9wTrYggoGxval3sBOh2Z5ofmmWJyq+bXmYOfg6LEe
> QkEzCzc9zolwFcq1JKjPa7XSQCGYzyI0zzvFIoTgxQ6KfF2I5DUkzps+GlQebtuy
> h6f88/qBVRRiClmpIgUxPoLW7ttXNLwzldMXG+gnoot7TiYaelpkttGsN/H9oPM4
> 7HLwEXWdyzRSjeZ2axfG34arJ45JK3VmgRAhpuo+9K4l/3wV3s6MJT/KYnAK9y8J
> ZgfIPxz88NtFMN9iiMG1D53Dn0reWVlHxYciNuaCp+0KueIHoI17eko8cdLiA6Ef
> MgfdG+RCzgwARWGAtQsgWSl4vflVy2PFPEz0tv/bal8xa5meLMFrUKTX5hgUvYU/
> Z6tGn6D/Qqc6f1zLXbBwHSs09dR2CQzreExZBfMzQsNhFRAbd03OIozUhfJFfbdT
> 6u9AWpQKXCBfTkBdYiJ23//OYb2MI3jSNwLgjt7RETeJ9r/tSQdirpLsQBqvFAnZ
> 0E6yove+7u7Y/9waLd64NnHi/Hm3lCXRSHNboTXns5lndcEZOitHTtNCjv0xyBZm
> 2tIMPNuzjsmhDYAPexZ3FL//2wmUspO8IFgV6dtxQ/PeEMMA3KgqlbbC1j+Qa3bb
> bP6MvPJwNQzcmRk13NfIRmPVNnGuV/u3gm3c
> -----END CERTIFICATE-----
"

If you type in the quote, hit enter, you’ll be given a prompt to enter the data for the certificate, which you end with another quote, then enter.

For fetching the certificate, it’s straightforward:

# Downloading/Fetching the CA certificate
(config) # crypto certificate name steveBruleCA public-cert pem http://consentfactory.com/steveBruleCA.crt

Now after getting the certificate on the appliance, you need to put them in the trusted store like this:

(config) # crypto certificate ca-list default-ca-list name steveBruleCA

The CA certificate will be trusted now.

Second: Install the Certificate for the Web Service

Now we’re cookin’. Let’s download and install for the web service.

(config) # crypto certificate name webServiceCert public-cert pem fetch http://consentfactory.com/webServiceCert.crt

That’s it for the certificate.

Third: Install the Private Key

This will install the key and prompt you for the password for the private key:

(config) # crypto certificate name webServiceCert private-key pem fetch http://consentfactory.com/webServiceCert.key

Now we’re set to enable the web service to use the new certificate.

Fourth: Configure Web Service to Use New Certificate

This is the easy part:

web https certificate name webServiceCert

That it! No need to restart any services, as the appliance appears to take care of all of that on the backend.

You’re all done. Time to smile, look in the mirror, notice and ignore the zit, and maybe go look at some PCAPs.

All done!

Python TTP Template for Cisco ASA Configuration Files

When working with Cisco ASA configurations and with scripting/automation, you know that ASA configuration files are not written with structured data in mind. A great solution to this is to use a Python tool called Template Text Parser, or TTP for short, which is networking/systems focused Python library that allows you to create structured data (JSON or YAML) from semi-structured configuration files or from the output of CLI show commands.

More information about TTP can be found on the link above. If you want a great tutorial on TTP, Kirk Byers has a great series on TTP.

Below is a TTP template that I created to do the following:

  • Create structured data for objects and object groups
  • Includes network, service, and protocol groups
  • Creates structured data for ASA ACLs

The end goal for this template is to migrate configurations from ASA to Palo Alto PANOS, creating set commands for equivalent configurations. However, this template is only focused on creating structured data from ASA firewall rules (ACLs).

One note: ACL lines in ASA configuration files can be made up of likely a few hundred variations or more, particularly if you have logging/debugging on. This template includes most of the more common ACL configuration variations.

Quickie: Viewing Transceivers Inserted into Palo Alto Firewalls and Other Transceiver Bits

If you’re running a Palo 5200/7000 series firewall, you may have inserted transceiver modules and the only way you really know they’re recognized is if you get them online. While troubleshooting an issue, I found a item from the Palo Alto KB, namely the log file brdagent.log is where you can view the transceiver you inserted; the log itself is for monitoring interfaces and other networking chips being inserted (see book link below).

To view the log, I prefer to use the tail command to view the log, which is a Unix/Linux command to view the last section of the log file, and even to watch the log file as it’s being used.

The command:

tail lines 100 follow yes cp-log brdagent.log
<bunch of log files>
cp brdagent.log 2019-10-03 17:10:40 2019-10-03 17:10:40.001 -0600 Port 25: Down 40Gb/s-full duplex
cp brdagent.log 2019-10-03 17:10:40 2019-10-03 17:10:40.001 -0600 PORT25: board_port_autoneg_enabled -> board_port_autoneg, link: 0, mode: 1
cp brdagent.log 2019-10-03 17:11:40 2019-10-03 17:11:40.644 -0600 Error: gryphon_get_port_info(5200/gryphon_ports.c:1231): Remote fault detected on port 25!
cp brdagent.log 2019-10-03 17:13:22 2019-10-03 17:13:22.156 -0600 Port 25: sysd_obj_lookup for <QSFP> failed !!!
cp brdagent.log 2019-10-03 17:13:22 2019-10-03 17:13:22.156 -0600 Port 25: Empty QSFP+ detected
cp brdagent.log 2019-10-03 17:14:07 2019-10-03 17:14:07.441 -0600 QSFP+ detected on port 25
cp brdagent.log 2019-10-03 17:14:07 vendor 'FINISAR CORP. '; part 'FTL4E1QE1C-A5 '; id 'QSFPP'

The command broken down:

  • tail – the Unix/Linux command that displays the last section of a file
  • lines 100–  displays the last 100 lines (or less) of the file
  • follow yes – informs the cli to continue printing any additional input to the file
  • cp-log– this is a directory for control plane logs, and according to Tom Piens with the Mastering Palo Alto Networks book below, there a few different directories for the management plane, data plane, and other logs. The log directories will vary based on models.
  • brdagent.log– the log filename.

As you see in the log above, you can see the the QSFP transceiver in the log. Using the tail follow command though, you can watch as transceivers are inserted, like this (I inserted a Cisco twinax as an example):

2021-05-25 13:50:34.663 -0600 Port 19: SFP Plus Empty detected
2021-05-25 13:50:51.756 -0600 Port 19 :: sfp_data.transceiver_codes(str) = 10000
2021-05-25 13:50:51.756 -0600 SFP Plus detected on port 19
vendor 'CISCO-TYCO '; part '2053783-3 '; tc '10000'
2021-05-25 13:50:51.757 -0600 Port 19: SFP Plus Fiber detected
2021-05-25 13:50:51.757 -0600 PORT19: board_port_sfp_nopop_0 -> board_port_startup, link: 0, mode: 2
2021-05-25 13:50:51.761 -0600 PORT19: board_port_startup -> board_port_autoneg, link: 0, mode: 2
2021-05-25 13:50:51.764 -0600 PORT19: board_port_autoneg -> board_port_autoneg_linked, link: 1, mode: 2
2021-05-25 13:50:51.764 -0600 Port 19: Up 10Gb/s-full duplex

I actually found a pretty good book that I purchased which breaks this down some of these commands. Mastering Palo Alto Networks: Deploy and manage industry-leading PAN-OS 10.x solutions to secure your users and infrastructure explains how to view some of these logs, particularly the section on ‘Debugging Processes’.

Other Transceiver Bits

Some additional bits I’ve learned recently:

  • Yes, you can other vendor/third-party transceivers in Palo Alto firewalls. Palo Alto publishes the details of the transceivers here. I haven’t ever encountered issues with other vendor transceivers, but that said, getting support if you have an issue and the transceiver is potentially the problem may not result in support from customer support.
  • While troubleshooting an HSCI port, I found that I could test if the optic was functioning correctly from the HSCI connecting the port to a switch and configuring layer 2 connectivity (ethernet). The transceiver responded, which makes sense because the configuration in HA sets the transport for HSCI as ethernet. Even though Palo says, “[t]he traffic carried on the HSCI ports is raw Layer 1 traffic, which is not routable or switchable. Therefore, you must connect the HSCI ports directly to each other (from the HSCI port on the first firewall to the HSCI port on the second firewall),” I found the HSCI at least responds to ethernet. So perhaps they mention this to indicate you shouldn’t bridge the connection (via layer 2 switch).
  • If you’re not getting complete session sync between a pair of HA firewalls, and even though your HA is showing as up, you should perhaps check your transceivers, particularly if you’re using non-Palo Alto transceivers.

Personal KB Reference:
https://github.com/consentfactory/knowledgebase/blob/master/networking/cisco/security/palo_alto/viewing_transceivers.md

Quickie: Importing Certificate Into Juniper Devices

Working in a Juniper SRX (or other model), you might have a need to secure the web interface with a certificate through the CLI. I had this need and ran into a problem where Junos wouldn’t recognize the input I gave in the CLI for the certificate (it was an issue with line breaks). The web management service wasn’t starting and I was receiving errors like the following in the httpd.log file:

httpd: Error: OpenSSL: Can't open certificate file: /var/etc/ssl/https.pem
httpd: Error: OpenSSL: Can't configure certificates

Searching online, there isn’t much that talks about this process, so this is an attempt to rectify that. The following is a quick breakdown of how to import a certificate into a Juniper SRX via the CLI. The process should be applicable for all Juniper devices (EX, MX, etc.), but I’ve only tested it on SRXs in 15.x+.

Generate Certificate

First off, generate a certificate. I’m not going into the details of how to generate a certificate because that’s outside the scope of this post, and your certificate process will vary.

For this process, I generate certificates outside the Juniper device with some scripts, so no need to create a CSR on the Juniper device and so forth. Typically I use a 2048 to 4096-bit key, and I like to create SAN/UCC certs for these device types so that I can include the hostname, FQDN, and IP address.

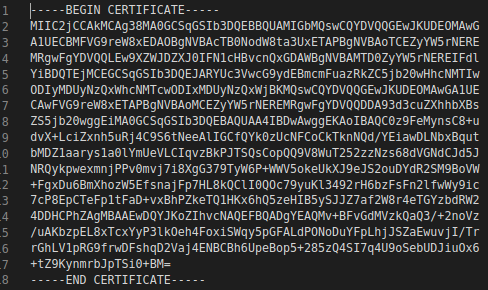
One important item here to note: your certificate format needs to be in base64/PEM format. In other words, it should be a file that looks something like this:

Example text output of base64/pem certificate.

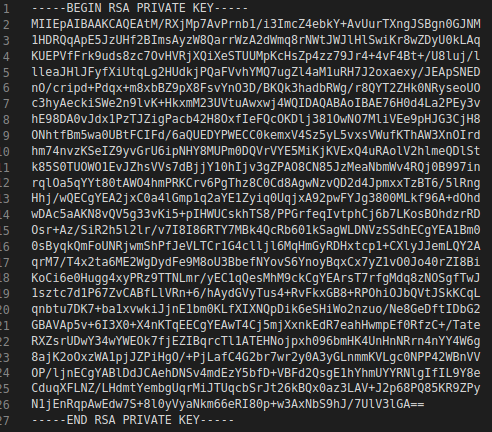
And your unencrypted private key like this:

Example text output of RSA private key

Combine Private Key and Certificate Into Single Line

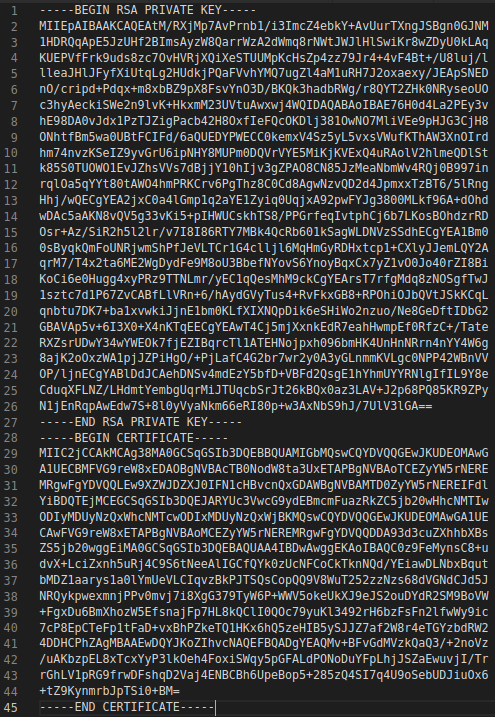
Next, I open up VS Code and concatenate the private key and certificate into one file:

Example of RSA private key and certificate as one file

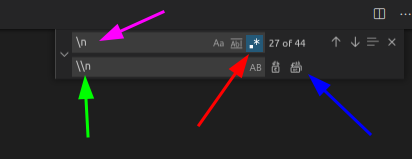
Now we’re going to replace all the line breaks with line breaks that Junos recognizes. Using below for reference, hit Ctrl+F (Find) or Ctrl+H (Replace) to get the find and replace box and click the drop-down arrow. Next switch to using regex (red arrow), then type ‘\n’ in the search field (pink arrow), type ‘\\n’ in the replace field (green arrow), and then click ‘Replace All’ button (blue arrow).

Example of using find and replace in VS Code

The end result should look something like this:

Example of RSA private key and certificate as a single line

Configure Certificate in Junos

To import configure the certificate in Junos, just copy the single line you created above then in configuration mode, enter the set command like below (with your single-line in-between the quotes):

set security certificates local <Junos Name for Cert> "<Transformed Private Key and Certificate>"

Example:

set security certificates local EXAMPLE-CERT-NAME "-----BEGIN RSA PRIVATE KEY-----\nMIIEpAIBAAKCAQEAtM/RXjMp7AvPrnb1/i3ImcZ4ebkY+AvUurTXngJSBgn0GJNM\n1HDRQqApE5JzUHf2BImsAyzW8QarrWzA2dWmq8rNWtJWJlHlSwiKr8wZDyU0kLAq\nKUEPVfFrk9uds8zc7OvHVRjXQiXeSTUUMpKcHsZp4zz79Jr4+4vF4Bt+/U8luj/l\nlleaJHlJFyfXiUtqLg2HUdkjPQaFVvhYMQ7ugZl4aM1uRH7J2oxaexy/JEApSNED\nnO/cripd+Pdqx+m8xbBZ9pX8FsvYnO3D/BKQk3hadbRWg/r8QYT2ZHk0NRyseoUO\nc3hyAeckiSWe2n9lvK+HkxmM23UVtuAwxwj4WQIDAQABAoIBAE76H0d4La2PEy3v\nhE98DA0vJdx1PzTJZigPacb42H8OxfIeFQcOKDlj381OwNO7MliVEe9pHJG3CjH8\nONhtfBm5wa0UBtFCIFd/6aQUEDYPWECC0kemxV4Sz5yL5vxsVWufKThAW3XnOIrd\nhm74nvzKSeIZ9yvGrU6ipNHY8MUPm0DQVrVYE5MiKjKVExQ4uRAolV2hlmeQDlSt\nk85S0TUOWO1EvJZhsVVs7dBjjY10hIjv3gZPAO8CN85JzMeaNbmWv4RQj0B997in\nrqlOa5qYYt80tAWO4hmPRKCrv6PgThz8C0Cd8AgwNzvQD2d4JpmxxTzBT6/5lRng\nHhj/wQECgYEA2jxC0a4lGmp1q2aYE1Zyiq0UqjxA92pwFYJg3800MLkf96A+dOhd\nwDAc5aAKN8vQV5g33vKi5+pIHWUCskhTS8/PPGrfeqIvtphCj6b7LKosBOhdzrRD\nOsr+Az/SiR2h5l2lr/v7I8I86RTY7MBk4QcRb601kSagWLDNVzSSdhECgYEA1Bm0\n0sByqkQmFoUNRjwmShPfJeVLTCr1G4clljl6MqHmGyRDHxtcp1+CXlyJJemLQY2A\nqrM7/T4x2ta6ME2WgDydFe9M8oU3BbefNYovS6YnoyBqxCx7yZ1vO0Jo40rZI8Bi\nKoCi6e0Hugg4xyPRz9TTNLmr/yEC1qQesMhM9ckCgYEArsT7rfgMdq8zNOSgfTwJ\n1sztc7d1P67ZvCABfLlVRn+6/hAydGVyTus4+RvFkxGB8+RPOhiOJbQVtJSkKCqL\nqnbtu7DK7+ba1xvwkiJjnE1bm0KLfXIXNQpDik6eSHiWo2nzuo/Ne8GeDftIDbG2\nGBAVAp5v+6I3X0+X4nKTqEECgYEAwT4Cj5mjXxnkEdR7eahHwmpEf0RfzC+/Tate\nRXZsrUDwY34wYWEOk7fjEZIBqrcTl1ATEHNojpxh096bmHK4UnHnNRrn4nYY4W6g\n8ajK2oOxzWA1pjJZPiHgO/+PjLafC4G2br7wr2y0A3yGLnmmKVLgc0NPP42WBnVV\nOP/ljnECgYABlDdJCAehDNSv4mdEzY5bfD+VBFd2QsgE1hYhmUYYRNlgIfIL9Y8e\nCduqXFLNZ/LHdmtYembgUqrMiJTUqcbSrJt26kBQx0az3LAV+J2p68PQ85KR9ZPy\nN1jEnRqpAwEdw7S+8l0yVyaNkm66eRI80p+w3AxNbS9hJ/7UlV3lGA==\n-----END RSA PRIVATE KEY-----\n-----BEGIN CERTIFICATE-----\nMIIC2jCCAkMCAg38MA0GCSqGSIb3DQEBBQUAMIGbMQswCQYDVQQGEwJKUDEOMAwG\nA1UECBMFVG9reW8xEDAOBgNVBAcTB0NodW8ta3UxETAPBgNVBAoTCEZyYW5rNERE\nMRgwFgYDVQQLEw9XZWJDZXJ0IFN1cHBvcnQxGDAWBgNVBAMTD0ZyYW5rNEREIFdl\nYiBDQTEjMCEGCSqGSIb3DQEJARYUc3VwcG9ydEBmcmFuazRkZC5jb20wHhcNMTIw\nODIyMDUyNzQxWhcNMTcwODIxMDUyNzQxWjBKMQswCQYDVQQGEwJKUDEOMAwGA1UE\nCAwFVG9reW8xETAPBgNVBAoMCEZyYW5rNEREMRgwFgYDVQQDDA93d3cuZXhhbXBs\nZS5jb20wggEiMA0GCSqGSIb3DQEBAQUAA4IBDwAwggEKAoIBAQC0z9FeMynsC8+u\ndvX+LciZxnh5uRj4C9S6tNeeAlIGCfQYk0zUcNFCoCkTknNQd/YEiawDLNbxBqut\nbMDZ1aarys1a0lYmUeVLCIqvzBkPJTSQsCopQQ9V8WuT252zzNzs68dVGNdCJd5J\nNRQykpwexmnjPPv0mvj7i8XgG379TyW6P+WWV5okeUkXJ9eJS2ouDYdR2SM9BoVW\n+FgxDu6BmXhozW5EfsnajFp7HL8kQClI0QOc79yuKl3492rH6bzFsFn2lfwWy9ic\n7cP8EpCTeFp1tFaD+vxBhPZkeTQ1HKx6hQ5zeHIB5ySJJZ7af2W8r4eTGYzbdRW2\n4DDHCPhZAgMBAAEwDQYJKoZIhvcNAQEFBQADgYEAQMv+BFvGdMVzkQaQ3/+2noVz\n/uAKbzpEL8xTcxYyP3lkOeh4FoxiSWqy5pGFALdPONoDuYFpLhjJSZaEwuvjI/Tr\nrGhLV1pRG9frwDFshqD2Vaj4ENBCBh6UpeBop5+285zQ4SI7q4U9oSebUDJiuOx6\n+tZ9KynmrbJpTSi0+BM=\n-----END CERTIFICATE-----"

Commit the config and you’re set.

Optional: Set the Certificate in Web Management

If you haven’t set a certificate yet for the web-management service, the command below will configure it with the certificate name you used:

set system services web-management local-certificate EXAMPLE-CERT-NAME

Optional: Restart Web Management

As a general practice from managing Linux boxes, I like to restart the web management service. In operational mode, run the following to restart the web-management service:

restart web-management

That’s it! You should be set.

Monitor or View Log Files

If you want, you can look at the httpd.log file to watch the process:

monitor start httpd.log #monitors log file

or

show log httpd.log