SCCM Peer Cache: When Reversing It Doesn’t Reverse It

(Note: For some reason I wrote this up in December 2017 and never published it. Maybe I forgot to add some links, but I put the work in and it seems to still be relevant. As noted in the bottom, this should have been resolved in 1802.)

Last week I had some SCCM woes with the peer cache feature, the gist of which is that application install steps during OSD would effectively stall out. Why? That was the great mystery that had me sweating overcaffinated bullets as people out in the field are notifying me and my boss that they can’t image, and of course at a time when certain important devices need to be imaged.

“Why in the world is this not working?” I asked myself. I can only presume it was the result of me enabling the feature across our organization, but there’s more to the story than that.

I know what you’re saying: “Did you freaking test it before deploying it?

Of course I did. I had spent the last few months testing BranchCache and Peer Cache in a lab setup and then in a local site. They both were working well, and I had no indications that either was causing a problem. In fact, I was able to measure noticeable improvements in application and software update delivery as a result of enabling the changes! However, I never had an issue with OSD in my lab or at the site I tested, and so I had no idea to expect it.

What I encountered in CAS.log during OSD was this on all the affected machines:

<![LOG[   Matching DP location found 0 - https://machine1.contoso.org:8003/sccm_branchcache$/content_87fa3d3b-4e22-4378-928e-fe79b2852a4f (Locality: ADSITEPEER)]LOG]!><time="17:07:20.657+360" date="11-02-2017" component="ContentAccess" context="" type="1" thread="3804" file="downloadcontentrequest.cpp:1020">
<![LOG[   Matching DP location found 1 - https://machine2.contoso.org:8003/sccm_branchcache$/content_87fa3d3b-4e22-4378-928e-fe79b2852a4f (Locality: ADSITEPEER)]LOG]!><time="17:07:20.657+360" date="11-02-2017" component="ContentAccess" context="" type="1" thread="3804" file="downloadcontentrequest.cpp:1020">
<![LOG[   Matching DP location found 2 - http://dp02.contoso.org/sms_dp_smspkg$/content_87fa3d3b-4e22-4378-928e-fe79b2852a4f.1 (Locality: ADSITE)]LOG]!><time="17:07:20.657+360" date="11-02-2017" component="ContentAccess" context="" type="1" thread="3804" file="downloadcontentrequest.cpp:1020">

And quite a bit more than that, but this is what peer caching is supposed to do. It effectively creates a bunch of mini-DPs across your boundary group, but there’s one problem that I didn’t take into consideration, and it’s why my environment that I tested in didn’t have this problem but the problem appeared in production: we have a TON, and I mean a TON, of laptops, and those laptops are mostly in carts powered off or (hopefully) sleeping. So peer caching may not work for us.

But then why didn’t the distribution point take over? Why didn’t the client download from it? No idea, but I needed to move on, fast.

After seeing those logs (note the name of the URL has “BranchCache” in it, but it’s actually peer cache, but I didn’t know this at the time) and knowing the change I made recently, I figured I’ll just reverse the changes and it’ll be all good, right?

Thumbs Up.
We got this. We’ll just reverse the changes.

Wrong.

Well then what the hell is going on?

What the hell?

Feeling even more under the gun now that I’m completely baffled with what’s happening, I engage with Microsoft Premier support because I feel that I could keep plugging away and googling the problem to death, or I could cut to the chase and get Microsoft involved.

Microsoft gets in touch with me, and after going over all the information I sent them and looking over the logs I was noticing, the tech fairly quickly identifies the issue as being a problem with the current build of peer cache (as of 2018.11.01-ish). Apparently even though peer cache is disabled in client policy, the changes don’t actually work and the database in SCCM still contains all the super peer entries. The fix that resolved it was to delete the super peers out of the DB with these SQL query/commands:

delete from SuperPeers

delete from SuperPeerContentMap

Bam! The problem was solved. Mostly. Kind of. The tech thought OSD was working, so it must be fixed.

The problem though is that the database keeps getting full of super peer information, so it needs to be routinely cleared out, and the super per clients need to update their super peer state. So after following these two blogs, and then getting annoyed with cleaning the DB manually and updating the collection, I put together this crude script as a scheduled task to take care of it.

(Edit 20180525): To run this script, you’ll need a few prereqs:

  • PowerShell 5.1. This was tested running on that version. You can find your version by typing $PSVersionTable in a PowerShell terminal. This may work on earlier versions, but I never tested this on earlier versions.
  • SCCM Admin console installed on the machine you’ll run this from.
  • You need the SQLServer module installed. Assuming you’re on PowerShell 5.1, you can get it by just running ‘Install-Module SQLServer’, then import it in with ‘Import-SQLServer’.
  • Finally, you’ll need to adjust the script for your own local information (site code, servers, etc.)

(Edit2 20180529): After reading this over again, it might be helpful if I explain what my script does, at least a high-level. The comments in the code explains what it does at a line-by-line level. What the script below does:

  • Imports modules needed (SCCM and SQL)
  • Reads superPeers.txt and performs a SQL query to get current Super Peers, then concatenates both ingests
  • Creates a SCCM collection based on the resourceIDs that we just ingested
  • Invokes a client update notification telling the Super Peers to update their client policies
  • Keeps a list of all resourceIDs used for this process
  • Deletes the Super Peers and Super Peers mappings from the database

The basic idea is to get these various devices out there to update themselves and to clear them out of the database, otherwise other devices may try to still use them as Super Peer/mini-DP.

Next, what I’ve done is run this script in an elevated prompt, and then let it do it’s thing.

Script:

# Set Date for future use
$date = Get-Date -Format yyyyMMdd.HHmm

# Import ConfigMgr Conosle Module
Import-Module "$($ENV:SMS_ADMIN_UI_PATH)\..\ConfigurationManager.psd1" # Import the ConfigurationManager.psd1 module 

# Import SQLServer Module (Forgot this, thank you RiDER)
Import-Module SQLServer

# Starting transcript to keep track of what the heck is going on
Start-Transcript -Path "<path to file>\superPeerCacheCleanup\superPeerLog_($date).txt"

# Setting global 'WhatIf' and 'Verbose' parameters for testing or output
$WhatIfPreference = $false
$VerbosePreference = "Continue"

# Collection name that will contain peers
$collectionName = "Super Peers"

# Getting contents of text file that already contains Super Peers that we've already queried for
$superPeers = Get-Content "<path to file>\superPeerCacheCleanup\superPeers.txt"
# Run SQL query to get the resourceIDs of the Super Peers, and adding a comma to the end of resourceID gathered
$resourceIDS = (Invoke-Sqlcmd -Query "select * from SuperPeers" -ServerInstance "localhost" -Database "<SCCM DB>" | select resourceId -ExpandProperty resourceid) -join ","

# Combine the contents of the Super Peer text file and SQL query into an array
$newResourceIDS = $superPeers + "," + $resourceIDS

# Create the query rule that we'll use to indicate the membership for the SCCM collection
# This query sets the membership based on the resourceIDs that we gathered and concatenated earlier
$collectionQueryRule = "select SMS_R_SYSTEM.ResourceID,SMS_R_SYSTEM.ResourceType,SMS_R_SYSTEM.Name,SMS_R_SYSTEM.SMSUniqueIdentifier,SMS_R_SYSTEM.ResourceDomainORWorkgroup,SMS_R_SYSTEM.Client `
from SMS_R_System where SMS_R_System.ResourceId in (" + $newResourceIDS + ") order by SMS_R_System.Name"

# Set the PSPath Site Code Location. This is needed because running the SQL query changes the path to 'SQLSERVER'
# Probably a better way of doing this, but this works for this purpose
Set-Location "<SITECODE>:"

# Capture the collection query rule into a variable. I couldn't get the pipe to work correctly for removing the rule
# so I'm just capturing it as a variable.
$membershipRule = Get-CMCollectionQueryMembershipRule -CollectionName $collectionName

# Remove the collection query membership rule in order to create and update the collection with a new one
Remove-CMCollectionQueryMembershipRule -CollectionName $collectionName -RuleName $membershipRule.RuleName -Confirm:$false -force

# Updating the colection with the new query membership rule that we create above
Add-CMDeviceCollectionQueryMembershipRule -CollectionName $collectionName -RuleName "Super Peers $($date)" -QueryExpression $collectionQueryRule -Confirm:$false

# Tell SCCM to update the membership of the SCCM collection
Invoke-CMCollectionUpdate -Name $collectionName

# Pausing for a moment to allow SCCM to update the membership of the collection. This is an arbitrary time; could be shorter/longer.
Start-Sleep -Seconds 60

# Creating a backup of the old Super Peer list
Copy-Item "<path to file>\superPeerCacheCleanup\superPeers.txt" "<path to file>\superPeerCacheCleanup\superPeersOld.txt" -Force
# Deleting the super peer list. 
Remove-Item "<path to file>\superPeerCacheCleanup\superPeers.txt" -Force
# Creating a new Super Peer list based on combining the old values and new from the SQL query
Add-Content -Value $newResourceIDS -Path "<path to file>\superPeerCacheCleanup\superPeers.txt" -Force

# Sending a client notification in order to tell the new Super Peer clients to run the Super Peer state script 
Invoke-CMClientNotification -DeviceCollectionName "Super Peers" -NotificationType RequestMachinePolicyNow

# Deleting the Super Peer values from the SCCM DB
Invoke-Sqlcmd -Query "delete from SuperPeers" -ServerInstance "localhost" -Database "CM_PRI"
Invoke-Sqlcmd -Query "delete from SuperPeerContentMap" -ServerInstance "localhost" -Database "CM_PRI"

# Ending the transcript
Stop-Transcript

Update: As of December 2017, the issue still persisted, which might have been because the clients weren’t getting their client policies updated, so the Microsoft tech had me recreated some of the client policies and deploy them. The issue seems to have been fixed as those dang laptops start getting powered on. The tech also informed me that this behavior is resolved in SCCM 1802.

Also, I suspect that the issue was not only due to laptops becoming superpeers and not being powered on, but also because the boundary groups configured were too broad and spanned too many sites. Not the primary issue, but it definitely contributed to it.

We have continued to use BranchCache and it’s amazing how well BranchCache is working in our organization, even with a ton laptops in carts (45-53% of content source comes from BranchCache at these sites).

IIS URL Rewrite Basic Walkthrough

Over the years doing various Skype for Business deployments, or just doing some vanilla web server work, I’ve needed a reverse proxy that was simple and easy to deploy. There are quite a few out there such as HAProxy (my preference), NGINX, and then some commercial products like KEMP. However, the deployments I was doing didn’t really need the investment of a major appliance, and some of the users I was working with preferred to steer clear of Linux/Unix systems, so a great choice for this is IIS Application Request Routing. This is a simple reverse proxy that, after a few tweaks, can do the job well with minimal effort.

However, I wanted to get a little more complicated with the reverse proxy and it’s URL rewrite rules, so I decided dig in and figure out the URL rewrite logic a little better, which is the focus of this post. This is going to be GUI focused, but there are certainly better ways to do this via XML, but this was the easier approach that I took at the time.

(If you’re looking on how to set up IIS ARR, check this blog out, read the documentation from Microsoft on IIS ARR, or google it.)

Simple goals here:

  • Create two rules to reverse proxy the “cookies” and “cupcakes” traffic to the web server, both for HTTP and HTTPS
  • Create a catch-all rule to send everything else to giantmidgets.org

Setting Up HTTP Reverse Proxy Rule/Back-References Demonstrated

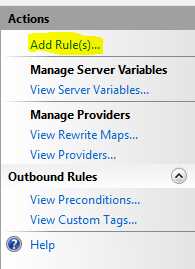
After setting up the server farms that the URL rewrite will direct traffic to, go to the root of the server and open up ‘URL Rewrite’, then I clicked ‘Add Rule(s)…’

Add Rule(s)...

I went ahead and selected ‘Inbound Blank Rule’. I want to keep this simple.

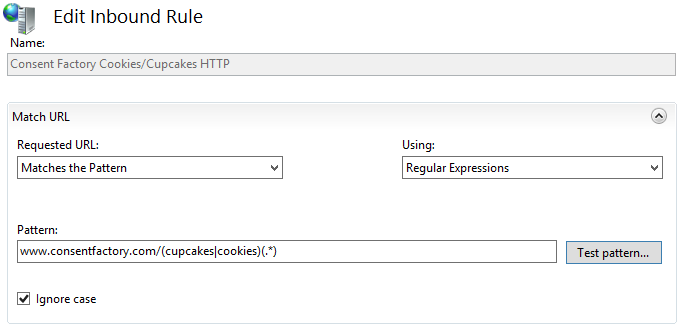
I named it something useful (I’m creating a rule for HTTP and HTTPS separately). Then I put in the pattern I needed:

Routing Rule for Match URL

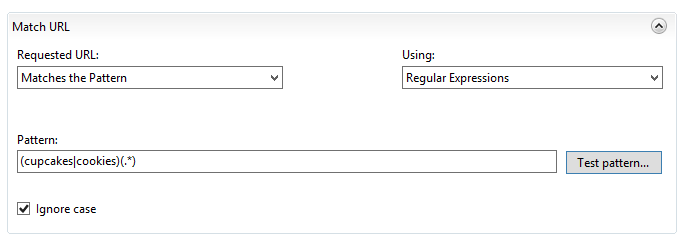
This is a regex that looks for anything with “www.consentfactory.com/”, and for the URL path to either have “cupcakes” or “cookies”, then whatever string is available after that.

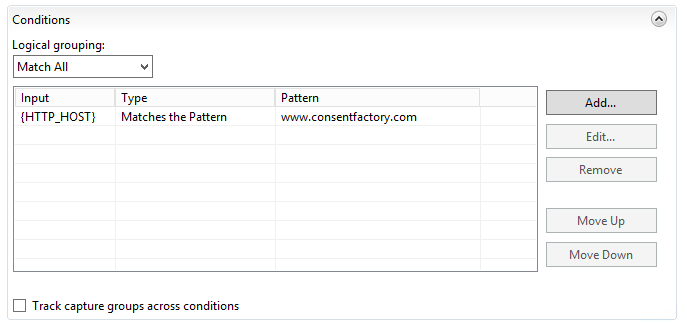
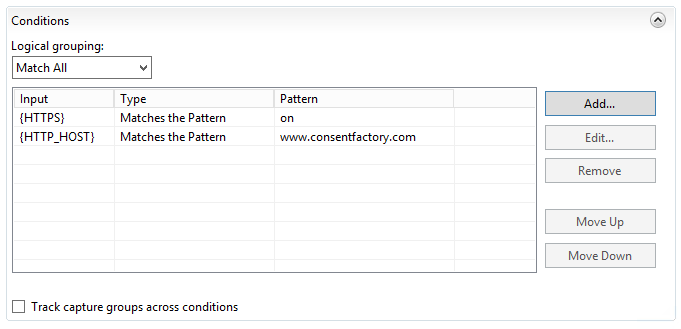
Next, I set up my conditions:

HTTP Conditions

The condition basically requires the FQDN to be present. Next comes the routing rule:

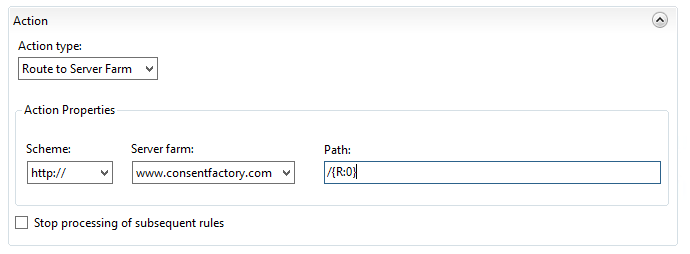
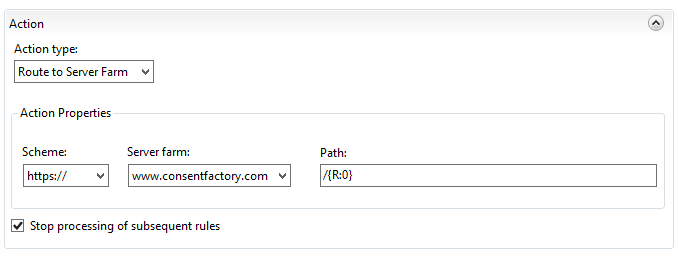
Route to Server farm rules
Something is wrong here.

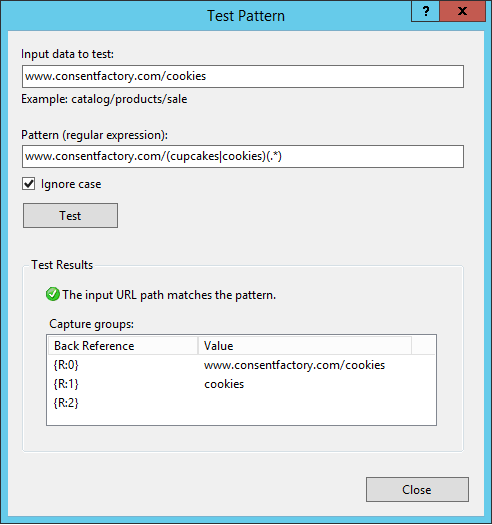
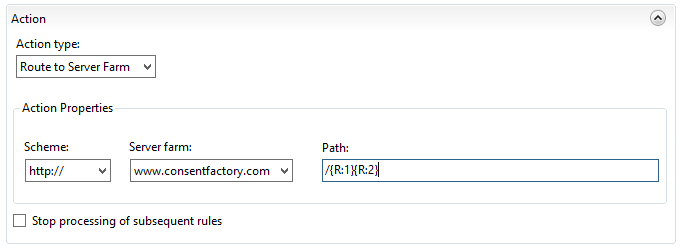
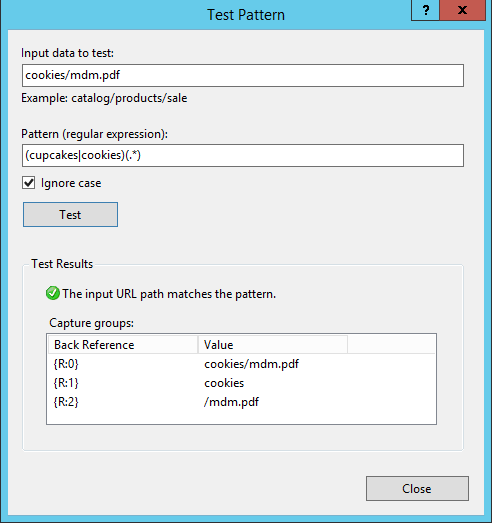
Here I’m stating that the action type is to route to the server farm (basically the ARR component of this), then to send it as HTTP with the path taken from after the FQDN of the request. However, note the “Path” field; it says “/{R:0}”, but what the heck does that value come from? To see that value, click on ‘Test Pattern’ up at the top of the rule under ‘Match URL’:

Match URL Pattern Test

Input the URL that you’re trying to reverse proxy in the ‘Input data to test’ field, then click ‘Test’. This is actually how you can see those ‘{R:X}’ values will be derived. These are called ‘back references‘, and the format ‘{R:X}’ refers to matching rules from the ‘Match URL’ section. {R:0} will always contain the entire string being sent, which is why my routing action for routing to the web server is incorrect because if I were to leave it like that, anything after the FQDN would be sent, which currently would add “/www.consentfactory.com/cookies” to “www.consentfactory.com”, looking like “www.consentfactory.com/www.consentfactory.com/cookies”.

There are two ways to fix this.

One approach would be to just correct the routing action to use {R:1} and {R:2}, like this:

Routing rules with {R:1} and {R:2} concatenated

However, my preferred approach is to keep the regex more simple, which allows us to use the original routing action of {R:0}, so I configure my regex URL matching to look like this:

Cleaner Match URL with "www.consentfactory.com/" removed

Which tests out our back-reference values to look like this, thereby allowing the {R:0} rule:

{R:0} is cookies/mdm.pdf, {R:1} is cookies, and {R:2} is /mdm.pdf

Now that’s done, the HTTP rule is set up. The only thing left is to set up the HTTPS rule, and a catch all for anything that isn’t in a subdirectory.

HTTPS Reverse Proxy

The HTTPS rule is the same as the HTTP rule, except we adjust the condition to look for HTTPS being used like this:

HTTPS condition is set to 'on'

The routing rule will be configured like this:

Note the 'Scheme' field is set to HTTPS

Catch-All Redirect Rule

Finally, I’m creating a rule to just catch anything that isn’t a specific subdirectory of consentfactory.com. The rule will be the same as the HTTP rule, but the routing action will actually be a redirect somewhere else, like this:

Redirection to Another Site Using 'Redirect', the url of the site, and '301 Permanent' for redirect t ype

Hopefully this helps explain that process a bit. It helps me to see examples, so maybe this will help others.

(Edit (20171023): my HTTPS routing rule image was incorrect. It didn’t use “https://” for the ‘Scheme’, which is what we want it to route to.

Microsoft Ignite 2017 Thoughts

A few weeks ago I had the pleasure of attending Microsoft Ignite 2017 in Orlando, Florida, one of the best and well-organized conferences I have ever attended. There were a ton of sessions to attend for people of all backgrounds in IT, so I couldn’t hit them all (thankfully they’re posting the sessions on YouTube).

It’s a juggling act at events like this to strike the balance between personal interest and getting information/training to add value to the organization that sends you, so I focused on Windows 10 Deployment, Azure IaaS, and whatever Powershell nuggets I could find. All three topics are too much for one post alone, so I wanted to dump some thoughts on one that stuck out the most: Windows 10 Deployment.

Creeping from the Old to the New: Windows 10 Deployment

Device deployment in the Microsoft world has been dominated by what they call “traditional IT”, which we in the SCCM/MDT world would just call imaging. The “traditional” method of deploying devices often involved a lot of preconfiguration before the device actually reached the end-users, often with BIOS updates/configs and the tried and true method of wipe and load.

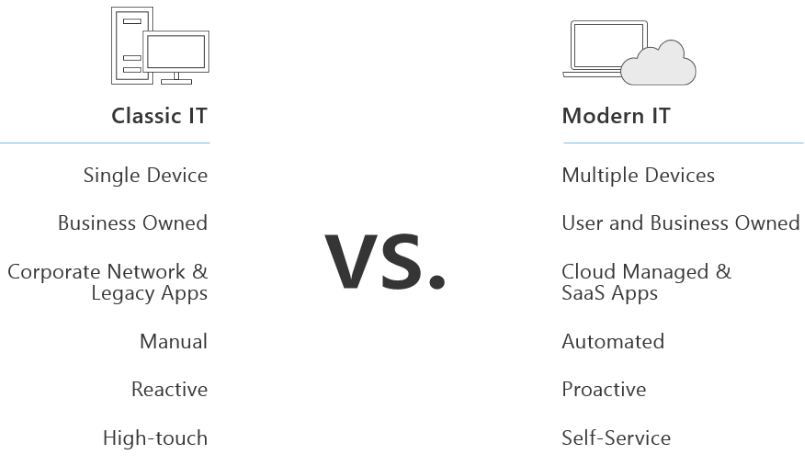
Of course, at Microsoft Ignite, you’re going to get proselytized about the company’s newest technology, and the direction Microsoft is transitioning to is something they call “modern IT”. It’s best summarized in this slide from Michael Niehaus’ session on deploying Windows 10:

Traditional IT VS Modern IT

In practice, what this actually looks like is a bit of gradient between on-premise and cloud-based services, but the direction Microsoft is taking is to move identity services to Azure Active Directory, device management to InTune, applications are deployed from the Windows Store, and updates are managed via Windows Updates for Business. The entire process initiated on end-devices after a user logs into a device with their email and password with an Internet connection, removing the need for special provisioning. The entire process is summarized into what Microsoft calls “Windows AutoPilot“.

However, what I took from AutoPilot and all the deployment sessions was that while Microsoft would love for organizations to move their deployments online and sign-up for that recurring revenue, they know this is still a little ways off and doesn’t offer the feature parity of AD/SCCM. So instead, they’ve designed InTune and SCCM to really work in what they call “co-existence”, which comes from using the old and new methods together as a form of transition (to varying degrees): InTune-SCCM-AAD, or InTune-SCCM-AD, or (insert combo). The idea here is to not go full cloud, but transition to it to some degree.

One of the deployment MVPs who represented Microsoft explained it to me like this. Microsoft’s story about centralized Windows management has been largely one-sided for over 20 years: SCCM or nothing. There was no middle-ground between nothing and SCCM (although you could cobble-up some combination of AD, MDT, and scripts). InTune, AutoPilot, Windows Store — the combination of it all presents a middle-ground, a sort of gradient to centralized management. If you want a lot of control over your devices, continue using SCCM; if you want something simple, you have InTune now.

I think what Microsoft has done is make an interesting case for “modern” deployment, but until their on-premise AD component is deployed and fully-tested, I just don’t see a compelling case to even try InTune yet. The current deployment process, while not perfect, works pretty well, so this would have to be hardware that is proven to work well. Past experience makes me skeptical that hardware will work as well and consistently as SCCM OSD does (then again, I’m not working with users across the globe, so maybe there’s a better case to be made in that scenario).

Modern Windows 10 Deployment and Education

Bringing this closer to the industry I currently work in, Microsoft’s case for Windows 10 deployment and management for education is strong and better than ever before. Windows AutoPilot is indeed a great way to deploy devices (no matter which way you approach it), Azure AD and Office 365 are stellar products, OneNote is awesome (best education tool I’ve seen), Microsoft Teams looks amazing (especially with its takeover of Skype for Business and integration with Microsoft Classroom), and Microsoft’s licensing is making a big change. The classroom tools are indeed there, and management is as easy as G Suite (IMO).

However, I can’t help but ask: has the ship already sailed for a lot of K-12 organizations? I mean, Microsoft certainly has this great product for K-12, but a lot of organizations have already made massive investments in their device purchases, the technology choices they’re using in the classroom, and the email/cloud platform that they’re running applications with. These organizations already have inertia in the direction of these choices, so does Microsoft have enough to unbalance this forward motion?

Office 365 vs. G Suite

I personally don’t think so, at least for the G Suite organizations. These organizations chose G Suite (or Google Apps at the time) largely because they could purchase educational devices for cheap, thereby getting more devices into student’s hands, and Google’s services (which users organically learned to use over the years) was free. Around the same time, Office 365 licensing was confusing, and while there were some free options, the service parity for device management just wasn’t there compared to G Suite.

Fast forward to today, and the case for medium and large education institutions moving to Microsoft 365 is more compelling in the context of data security. The new A3 and A5 pricing structures from Microsoft bring with them EMS, thereby allowing greater data loss protection and services. Meanwhile, Google removes feature parity between it’s Education and Enterprise products, requiring organizations acquire the Enterprise suite at $25/user per month for services such as DLP.

Education Desktop Bundling Licensing Changes

Maybe it’s the Microsoft Ignite kool-aid in my system, but Microsoft has a better case for it’s products than Google with it’s licensing combos, or maybe Microsoft is just better at marketing and promoting it’s platform than Google. In the education world, I hardly ever hear from Google themselves promoting their products, it’s always someone doing something randomly. Microsoft constantly makes contact with my org, but Google — not a peep.

Kid drinking Kool-Aid
Yes…give me more…

I’m going to go drink some MDT kool-aid now…

Quick Thoughts: A Little Confused About Windows 10 S in Education

Microsoft recently announced a new version of Windows 10 called Windows 10 S. This new version of Windows 10 is designed with education customers in mind, offering manageability and security similar to that of Chromebooks (which is what this OS is essentially competing with).

Windows 10 S machines are to be managed from Intune/Intune for Education, with programs available only from the Windows Store, and identity management is handled via Azure Active Directory. Windows 10 S machines prices will start around $189, making these machines definitely competitive with Chromebooks.

But why in the world would a school district choose to purchase these devices?

First off, the timing of this announcement seems a little late. Most schools where I live needed to have their budgets turned in long ago, and as a result have made purchasing decisions already. The machines are either already ordered and on their way, and/or the decision has already been made for the summer infrastructure plans and schools are preparing for the changes. Nothing in Windows 10 S stands out enough to stop the process and rethink what machines need to be deployed.

Second, Windows 10 S seems like it’s stuck in the middle of being like Windows, but also some new Windows Cloud OS. It looks and feels just like Windows 10, but behaves like a Microsoft Chromebook, and if an end-user, thinking that this Windows environment is just like any other Windows environment, they’ll probably find unexpectedly that they can’t install applications, are forced to have Edge as their default browser and Bing as their search engine, and probably won’t find Google Chrome in the Windows Store.

This is a huge problem for most mid-to-large school districts because there is a certain paradigm about how Windows machines are to be used, and administrators have designed their entire management infrastructure around this. Windows 10 S has no on-premise Active Directory domain-join, so that also means no group policy, no certificate enrollment for RADIUS authentication, or any other service that ties into the existing on-premise infrastructure.

As a result, Windows 10 S devices live as a fourth type of device to manage, next to Apple products, Chromebooks, and Windows machines. Windows 10 S devices are, in essence, in some other management world, unless, of course, you start tying together your on-premise devices with Intune/Intune for Education, but that assumes you’re not using a third-party MDM, which would complicate this further.

Even if you’re a small school/school district with limited resources, you’ve probably already moved to Chromebooks as your device of choice. Your email, office suite, and even file management are tied into G Suite now. Students, teachers, and staff are all familiar with G Suite and probably don’t care to uproot their files and teaching methods for Microsoft.

Don’t get me wrong: I think Microsoft has some pretty cool services and features in Office 365, but is it enough to for schools to have a complete paradigm shift and start purchasing cheap Microsoft devices? Not yet, but maybe. Microsoft needs to have a more compelling case that targets teachers and principals because people in information technology already understand what Microsoft has to offer, but sysadmins just maintain and expand the services based on the policies of what the curriculum makers decide.

Google has done an excellent job in giving teachers the tools they need, and they were the first to market for cheap, easy-to-manage devices. As a result, Microsoft has a tough hill to climb, and I just don’t think Windows 10 S is going to help enough to propel Microsoft over the hill, let alone up it.