Juniper Interface-Range: A Use Case

It’s holiday break! That means I have more discretionary time for topics such as… Juniper interface-ranges! Yay! Right?

Unenthusiastic Fry from Futurama

Ok, not the most exciting topic in the world, but hear me out — I think there’s a pretty good use case for using Juniper interfaces-ranges, which is a Junos feature that I think really stands out from other NOS’ that I’ve had exposure to. What is the use case? Simple: campus switch port configurations.

What is a Juniper interface range?

Let’s start by explaining what it is and is not, because if you’re coming from other vendors, the concept may be foreign and/or you may conflate it with features from others.

An interface-range is a logical construct in a Juniper configuration that aggregates multiple port configurations and places them into one configuration. Here is an example:

interfaces {
    interface-range workstations201 {
        member ge-0/0/0;
        member ge-0/0/1;
        unit 0 {
            family ethernet-switching {
                interface-mode access;
                vlan {
                    members 201;
                }
            }
        }
    }
    interface ge-0/0/0 {
        description "Workstation 1";
    }
    interface ge-0/0/1 {
        description "Workstation 2";
    }
}

Here I have two interfaces that are members of the interface-range ‘workstations201’; they both are access ports and both belong in VLAN 201. Here’s the configuration if I were to separate out the interfaces into separate configurations:

interfaces {
    interface ge-0/0/0
       description "Workstation 1"; 
       unit 0 {
            family ethernet-switching {
                interface-mode access;
                vlan {
                    members 201;
                }
            }
        }
    }
    interface ge-0/0/1
        description "Workstation 2";
        unit 0 {
            family ethernet-switching {
                interface-mode access;
                vlan {
                    members 201;
                }
            }
        }
    }
}

As you can see above,  interface configurations are often repeated multiple times if you configure them one-by-one, but interface-ranges simplify port configurations and reduce the number of lines of these repeated configurations (in a 48-port switch with each port the same, theoretically using an interface-range could remove up-to 384 lines). If you need to change a port to a different VLAN or different configuration, simply delete the interface’s membership from one interface-range and place it in another.

What interface-ranges are not: CLI commands for making mass interface changes. For that, Juniper has the wildcard range command. For more info on that here.

Configurations Beyond the Individual Interface

So reducing the number of lines of configuration is great, but so what? If you come from the world of other vendors, you’re already used to the idea of keeping port configurations and their protocols all in the interface’s configuration, so configuring edge ports this way isn’t going to offer you much.

In the Junos world though, interface’s don’t hold all the configurations for the ports. For example, if you want to configure a voice/auxillary VLAN, that configuration on Junos (well, in post ELS change*) is in the switch-options stanza of the configuration. Sure you could configure switch-options like this and have all access ports configured for VoIP like this:

switch-options {
    voip {
        interface access-ports {
            vlan PHONES;
            forwarding-class expedited-forwarding;
        }
    }
}

But what if you have devices that will utilize the voice/auxiliary VLAN, but you want them specifically in a separate VLAN than your voice/auxiliary VLAN? You would have to configure each port specifically for that protocol like this:

switch-options {
    voip {
        interface ge-0/0/0 {
            vlan PHONES;
            forwarding-class expedited-forwarding;
        }
        interface ge-0/0/1 {
            vlan PHONES;
            forwarding-class expedited-forwarding;
        }
    }
}

If you needed to make a change for an interface, and you’re doing this via CLI, managing these changes could get daunting.

Let take another place where configurations aren’t located in the same location: spanning-tree. It’s not enough in Junos to just turn on spanning-tree on all ports; you need to specify which ports are edge (to block BPDUs) and which ones are a downstream switch (ignore BPDUs). Often I have seen Junos configurations for campus gear look like this:

protocols {
    rstp {
        interface all;
        bpdu-block-on-edge;
    }
}

But from my experience, all that does is turn on RSTP, and ‘bpdu-block-on-edge’ does nothing because no ports are designated as ‘edge’. In order to accomplish the above, you need to designate edge ports and ports for downstream switches (no-root-port):

protocols {
    rstp {
        bpdu-block-on-edge;
        interface ge-0/0/0 {
            edge;
        }
        interface ge-0/0/1 {
            no-root-port;
        }
    }
}

Great, so now you’re having to manage port configurations in three stanzas, and you’re adding a hundreds of lines of configurations to each switch configuration. WTH, Juniper?

If only there was a way to simplify this…

Where Interface-Range Shines

Interface-range does simplify all of this and reduce the lines configuration! Instead of blabbing on and on about this, let me just show you exactly how this is simplified:

protocols {
    rstp {
        interface all;
        interface workstations201 {
            edge;
        }
        bpdu-block-on-edge;
    }
}
switch-options {
    voip {
        interface workstations201 {
            vlan PHONES;
            forwarding-class expedited-forwarding;
        }
    }
}

Using interface-range, we can treat the interface-range as an interface object and apply configurations to it just like you would individual interfaces. For ports needing voice/aux VLANs, we can configure only the ports needing it; for spanning-tree, we can designate edge and no-root-port more simply.

Another great example: what if you needed to quickly power cycle all IP speakers? Sure, you could set the following in CLI:

wildcard range set poe interface ge-0/0/[0-2,5,10,18] disable
commit

But what if you’re working in a virtual-chassis, and your wildcard range command won’t work to get all the ports in one line? Using interface-range, you can get them all in one line like this:

set poe interface ip_speakers disable
commit

Then BAM! You’ve turned off PoE and you can just rollback the config (or delete it, whatever floats your boat), and the IP speakers are rebooted.

Interface-range, for me, just seems like a more efficient way of managing ports configurations (even if you automate). Here’s an example that brings it all together:

interfaces {
    interface-range workstations201 {
        member ge-0/0/0;
        member ge-0/0/47;
        unit 0 {
            family ethernet-switching {
                interface-mode access;
                vlan {
                    members 201;
                }
            }
        }
    }
    interface-range ip_speakers {
        member ge-0/0/46;
        unit 0 {
            family ethernet-switching {
                interface-mode access;
                vlan {
                    members 401;
                }
            }
        }
    }
    interface-range wireless {
        member ge-0/0/1;
        native-vlan-id 100;
        unit 0 {
            family ethernet-switching {
                interface-mode trunk;
                vlan {
                    members 201 301;
                }
            }
        }
    }
    interface-range downstream_switches {
        member ge-0/0/2;
        native-vlan-id 100;
        unit 0 {
            family ethernet-switching {
                interface-mode trunk;
                vlan {
                    members all;
                }
            }
        }
    }
    ge-0/0/0 {
        description workstations201;
    }
    ge-0/0/1 {
        description wireless;
    }
    ge-0/0/2 {
        description switch_02;
    }
    ge-0/0/46 {
        description ip_speakers;
    }
    ge-0/0/47 {
        description workstations201;
    }
}
protocols {
    rstp {
        interface all;
        interface workstations201 {
            edge;
        }
        interface wireless {
            edge;
        }
        interface downstream_switches {
            no-root-port;
        }
        interface ip_speakers {
            edge;
        }
        bpdu-block-on-edge;
    }
}
switch-options {
    voip {
        interface workstations201 {
            vlan PHONES;
            forwarding-class expedited-forwarding;
        }
    }
}

Why Not Use Junos Groups Instead of Interface-Range?

From my experience, and from I can tell from working on campus switch configurations, groups don’t seem to offer the simplicity for port configurations like interface-range does, and, from all that I can gather, I cannot configure VLANs for interfaces and interface modes with  the group feature like I can with interface-range. When dealing with hundreds of campus switches and VC stacks, with all the port additions and changes, it just seems like interface-range is best approach for campus switching.

That said, once you get into the distribution and core layers, I’m less certain about the applicability for interface-range, but groups seem to be better suited here.

Edit (20191124.1945) – For a perspective from some people with more experience with apply-groups than myself, check out this post I made on the Juniper subreddit. There’s even examples for how to approach this from an apply-groups model. That said, I still think interface-range is a better approach for campus switching simply for the operational benefits you get with using them.

Caveats/Miscellaneous

There are a few caveats to keep in mind with interface-range, so I’ll note them quickly:

  • You can’t stage interface-ranges. An interface-range needs a member in order for it exist, so you can’t preconfigure them (although perhaps you could comment them out), and if your interface-range loses all members, you’ll need to either delete them or comment them out. Edit (20191124.1945) – This isn’t entirely true; one comment on Reddit suggests creating fake interfaces to stage them, but I’m not entirely sure if there aren’t any effects with that.
  • There are two ways to add members: member or member-range. I prefer to avoid member-range because if an interface changes in the range, you have to break up the range (IIRC). That said, if ports are static, you could use member-range or member (wildcard) statements to configure members.
  • I have had the CLI bark, but still commit, when interfaces were blank/missing, but had configurations in the interface-range area. I should verify this, but as of the time of writing this, this is what I recall.
  • Network admins/engineers who come from other vendors can get confused with interface-ranges, especially if you mix interface-ranges and standalone interface configurations. They make think something is missing and so forth; just make sure to brief them on it.

Final Thoughts

Junos has a lot of ways of accomplishing what you want, so what I’ve demonstrated here is just one way of accomplishing interface configurations; but from my experience, this seems like the more efficient way for campus switches.

Please let me know if there any mistakes in here or if you have a different way of using interface-ranges. Would love to be corrected or see other uses!

Thanks for reading.

* Enhanced Layer 2 Switching. Junos changed how configurations were done a few years back. Follow the link for more info.

Juniper EX3400: How to Recover from PoE Firmware Upgrade Failure

Updated 20200117. See below.
Updated 20200308. I might have a path for upgrade success. Maybe.

Did you know Juniper EX switches have PoE firmware updates to be applied?

Chelsea Lately - Great question. I had no idea.

Well, I didn’t until about a year ago when I did an upgrade and was checking on PoE power. Looking at the controller info from show poe controllerI noticed the following:

Juniper poe firmware available

Huh. Ok. Well, I’ve got a eight unit stack here, and the Juniper EX software upgrade is usually pretty solid, so let’s upgrade it — and it goes off without a hitch.

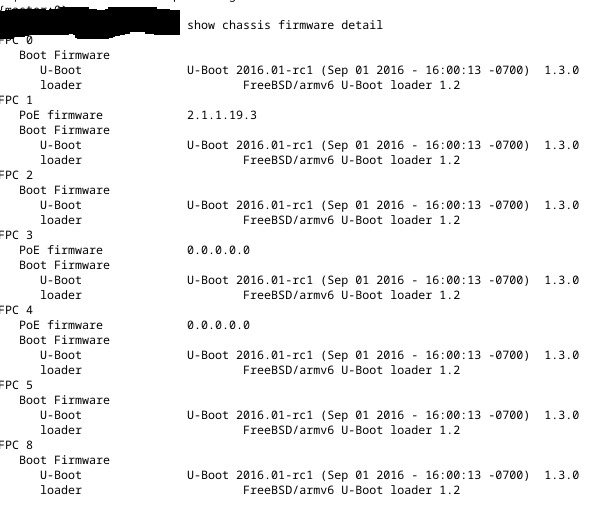
Fast forward nine months later, and I’m running into strange issues with PoE and Mercury door controllers, particularly model ‘MRE62E’. Basically the Juniper switches won’t provide power to this model, but the older MRE52’s had no problem. Checking out the firmware version using show chassis firmware detailI noticed that the switch had the older 1.x firmware and not the new 2.x.

PoE firmware 1.6.1.21.1


Alrighty then — let’s upgrade this stack. I upgrade the software using the latest JTAC recommended version (staying in 15.x), then upgrade the PoE firmware — no problem. Door controller is now getting power, I see a MAC address. Everything is hunky dory.

Now let’s upgrade this other stack.

No problems on EX software upgrade. Great. Now upgrade PoE firmware…

Ten minutes later, I get the following on the terminal:

Magic Thread Message

Of note, and the thing that made me panic, was that out of nine switches in the stack, only one came back online. Checking the firmware versions, I see the following:

Various PoE firmware versions, some missing, some 0.0.0.0.0, only one 2.x

Okay… F***. Well, let’s reboot the stack; perhaps a reboot is needed*. After reboot, I get the following:

PoE Device Fail on FPC 8. All but FPC 2 are missing.WTF.

Guy shaking head mouthing WTF

In the past when I’ve done a PoE firmware upgrade (between now and when I first learned about it), I had no recourse but to RMA the switch. Well in this case, I don’t have eight spare switches to fill this temporarily while I wait for an RMA! WTF am I going to do?!

Solving the PoE Firmware Upgrade Failure

If you’re in the same situation as I was in, take a deep breath — you’re not dead in the water.

There are two three scenarios for a PoE firmware upgrade failure that I’ve encountered, and I have a solution for both:

  • PoE Firmware Failure #1 – After firmware upgrade, you see a mixed result of firmware versions, some being 0.0.0.0.0, some being correct (2.1.1.19.3**), and some missing/blank (see picture above showing mixed/missing versions)
  • PoE Firmware Failure #2 – Perhaps you did as I did and rebooted and the PoE controller shows one with the message DEVICE_FAILED (see above)
  • PoE Firmware Failure #3 – #2 option doesn’t work and nothing you do is getting the PoE controller to upgrade. You may also have the process hang during the download, or if the controller is still at DEVICE_FAILED and you try to upgrade, you get a message Upgrade in progress, even after a reboot.

In all these solutions, here are some tips/info about the Poe upgrade procedure until Juniper fixes the process for upgrading them all at once:

  • Upgrade one at a time.

Solution for PoE Firmware Failure #1

If you encounter this failure, DON’T REBOOT THE STACK. You’ll make your life harder if you do.

Next, Juniper TAC (finally) has a solution — and it requires remote/on-site hands. If you’re going on-site or working with someone remotely, get yourself a cup of coffee (or beverage of choice) and some podcasts lined-up, because you’re going to be doing this awhile (~10 minutes for each switch/fpc).

From their site, the solution is the following (with my own notes):

  1. Power cycle the affected FPC (re-seat the power cord). Do not perform a soft reboot.
  2. After the FPC joins the VC or the standalone device reboots, execute one of the following commands in operational mode:
    request system firmware upgrade poe fpc-slot <slot>

    or
    Note: This is the method I used
    request system firmware upgrade poe fpc-slot 1 file /usr/libdata/poe_latest.s19
    JTAC Note: You need to change the fpc-slot number accordingly. Also, it is recommended that you push the PoE code one by one instead of adding all members in the virtual-chassis setup. (Emphasis mine)
  3. After the above command is executed, the FPC should automatically reboot. If not, reboot from the Command Line Interface.
    Note: Be patient and wait. No, seriously…wait. It takes awhile. If you need to reboot, you’re rebooting the whole unit AFAIK:
    request system reboot
  4. After the FPC is online, check the PoE version with the show chassis firmware detail command. The PoE version should be the latest version (2.1.1.19.3) after the above steps are completed.
  5. If the version is correct, the PoE devices should work.
  6. Repeat the above steps to upgrade the PoE versions on other FPCs in the virtual-chassis setup.

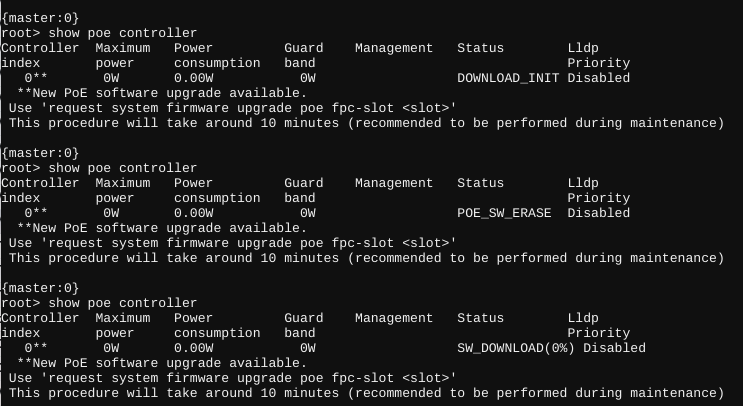
The one thing to note that when it’s doing its upgrade is that you can see the progress with show poe controller, but at some point it will hang at 95%, then disappear, then come back, then the process will be complete — in other words…WAIT, unless you want to try out the solution for failure #2. 😆

Solution for PoE Firmware Failure #2

In this scenario, you rebooted the stack and something failed. The following is similar to solution #1, but the failed PoE controller requires to basically upgrade it twice. The steps:

  1. Execute the following command to reload the firmware on the FPC:
    request system firmware upgrade poe fpc-slot 1 file /usr/libdata/poe_latest.s19
    Note: You need to change the fpc-slot number accordingly.
  2. The PoE controller will disappear when you run show poe controller, then come back and start upgrading like this:
    PoE firmware upgrading
  3. After the firmware upgrade completes, the firmware will likely be incorrect (it always was for me). Power cycle the affected FPC (re-seat the power cord). Do not perform a soft reboot.
  4. After the FPC joins the VC or the standalone device reboots, execute one of the following commands in operational mode:
    request system firmware upgrade poe fpc-slot 1 file /usr/libdata/poe_latest.s19
    JTAC Note: You need to change the fpc-slot number accordingly. Also, it is recommended that you push the PoE code one by one instead of adding all members in the virtual-chassis setup. (Emphasis mine)
  5. After the above command is executed, the FPC should automatically reboot. If not, reboot from the Command Line Interface.
    Note: Be patient and wait. No, seriously…wait. It takes awhile. If you need to reboot, you’re rebooting the whole unit AFAIK: request system reboot
  6. After the FPC is online, check the PoE version with the show chassis firmware detail command. The PoE version should be the latest version (2.1.1.19.3) after the above steps are completed.
  7. If the version is correct, the PoE devices should look like this:
    Successful PoE firmware upgrade
  8. Repeat the above steps to upgrade the PoE versions on other FPCs in the virtual-chassis setup.

Just like solution #1, one thing to note is that when it’s doing its upgrade you can see the progress with show poe controller, but at some point it will hang at 95%, then disappear, then come back, then the process will be complete — in other words…WAIT! You don’t really want to re-apply this whole process, do you?

Solution for PoE Firmware Failure #3 (Update 20200117)

I recently had some more issues, and solution #2 just wasn’t doing the trick, so I offer solution #3, which I’ve had success with but there’s a caveat/rabbit hole that may come of it. This is the nuke-from-orbit approach on the switch if you want to avoid doing an RMA (or if you have no choice).

The gist of it: disconnect the switch from the VC (if connected), perform an OAM recovery, zeroize and reboot the switch, then perform the firmware upgrade.

From my experience, there are a few different scenarios that you’ll encounter when you need to use this method:

  • During the firmware upgrade, the process just hangs/stalls. You’ll run show poe controller and at some point the download hangs/stalls like this:Terminal shows download hangs at 50%
  • You receive a DEVICE_FAIL for any reason and nothing is resolving it, like this:PoE Device Fail on FPC 8. All but FPC 2 are missing.
  • You’re switch is stuck at upgrading the firmware. No matter what you run, the switch displays the following message: Upgrade in progress. In this scenario, the switch just thinks it’s still in the process of upgrading, but no matter how long you wait (or if you can’t wait some indefinite period of time for it to upgrade), the switch won’t upgrade the firmware.

What we need to do at this point is just get the switch to fresh state so that we can upgrade the PoE controller; and believe it or not, this is actually one of the awesome things about Juniper equipment: when one component of the switch is hosed, the entire switch isn’t hosed and can still function normally. For instance, I have had a switch have a failed PoE controller, but the switch still operated like a non-PoE switch without issue; i.e., Juniper allows for components to be recoverable.

Here’s the solution I came up with:

  • Step 1: Zeroize the switch: request system zeroize
    In this step, we’re just starting fresh and clearing out the configuration, which takes about 10 minutes and then reboots. If the switch still thinks there’s an upgrade in progress for the PoE controller, we’re clearing it out. It’s possible that this may fail due to storage issues. If that’s the case go to the next step, otherwise skip to bullet #3.
  • If step 1 fails: Perform an OAM recovery: request system recover oam-volume
    This is an optional step, and I’ve had to do this when zeroize would fail. If step #1 happens, try this first. takes about 10 minutes as it copies the OAM partition then compresses it for the Junos volume.
    Caveat: EX3400s, even in 18.2 land, still have storage issues sometimes. I have one switch that couldn’t recover from oam-volume, and I’m not sure why. I’ll update this once I have a solution.
  • After the switch reboots, the controller will still come up as failed when you run show poe controller. Go ahead and run the upgrade again:
    request system firmware upgrade poe fpc-slot 1 file /usr/libdata/poe_latest.s19
    It should behave like this after running the command:PoE upgrade process for Juniper
  • The switch should behave normally at this point, upgrading normally. If it doesn’t then you’ll likely need to replace the switch (or live without PoE).

And reminder, just like solution #1 and #2, one thing to note is that when it’s doing its upgrade you can see the progress with show poe controller, but at some point it will hang at 95%, then disappear, then come back, then the process will be complete — in other words…WAIT! You don’t really want to re-apply this whole process, do you?

Final Thoughts

Here’s the kicker for me: I’ve had this work just fine for stacks and single switches alone, and fail on stacks and single switches alone — I can’t find the common denominator here. Perhaps there’s a hardware build that has this more than others, but I can’t figure it out. The official documentation doesn’t hint on a best practice for this (other than maintenance hours), so I’m uncertain on the best approach.

(Update) Juniper does have an official bug report for this, and is apparently fixed in 15.1X53-D592, but I had the issue on 18.2R3, so I’m not convinced it isn’t resolved yet.

Here’s some ideas I have to change my PoE firmware upgrade procedure (unsure if this will help):

  • Turning off PoE on all interfaces
  • Upgrading one at a time.
  • Trying an earlier version of the JTAC software, the going to the latest recommended. Example: I had no problems with 15.1X53-D59.4 or 15.1X53-D590, but the sample size for determining that is small (only two stacks attempted).
  • Update: I can’t find any rhyme or reason, TBH. I’ve had it fail multiple ways, so not sure the above will help.
  • Update 2: I have had some success with the following (but I don’t feel that confident about it yet):
    • Use the 18.2 branch
    • Upgrade one at a time
    • Waiting for a period of time after a software upgrade and reboot. Don’t get upgrade-happy. Give the hardware some time to get back up and going.
    • Cross your fingers. And legs. On a full moon.
  • Update 2: If you have a controller showing DEVICE FAIL, I’ve had success fixing it just by running:
    request system firmware upgrade poe fpc-slot 1 file /usr/libdata/poe_latest.s19 (change fpc-slot # accordingly)

Time will tell.

Hope this helps! If it doesn’t I’d love to know the different experiences others have. Please share if you’ve had success or failures with any of this!

* I swear I saw a message that a reboot is required, but I can’t confirm this (I didn’t screencap it)

** There is a version 3.4.8.0.26, but that’s on the 18.x software version line, and it requires a whole different set of upgrade procedures. This is outside the scope of this post.

ztpgenerator: A ZTP Python Script for Juniper Devices (Maybe more?)

This is a script I’ve been working on for simplifying the ZTP process for Juniper switches.

https://github.com/consentfactory/ztpgenerator

What does it do?

  • Updates ISC-DHCP for ZTP devices (creates DHCP reservations)
  • Creates Juniper configurations based on Jinja2 templates
  • Can also create virtual chassis configurations if desired

There’s some pre-work that needs to be done for set up, but it’s fairly simple to deploy and doesn’t require a lot.

All of the documentation is there on Github.

Hoping this helps others out there.

Install Wireshark 3.0.2 on Ubuntu Desktop 18.04 REDUX (Updated)

(Update 20201130):

Looks like the PPA is active again with at least 3.2.x (it was inactive and still running 2.x at the time I wrote this):

https://launchpad.net/~wireshark-dev/+archive/ubuntu/stable

I recommend using PPA versus compiling from source, unless you need to compile from source…or like to do it the hard way. 😛

(Updated 2020101 with new dependencies needed)

In my previous post, I gave instructions on how to build and install Wireshark 3.0.1 for Ubuntu 18.04, which did the trick at the time, but it was a little hasty and had a few bugs that I didn’t know how to resolve at the time. Come Monday morning at Sharkfest 2019, during a TLS training session with @SYNbit, I had a problem with decrypting packets (I couldn’t add RSA keys). I found out that in my compiling of Wireshark, I didn’t include the GNUTLS package — and actually, it turns out there’s a lot I didn’t include that would actually solve the bugs I mentioned in the previous post. You can see all I didn’t include in the compiling here:

Wireshark version without packages

So in other words, I didn’t compile this correctly, and even shared how to do it incorrectly. Not going to say I was wrong, but perhaps you could say it was half-baked.

Ya BLEW IT Gif Shaking Head Tim and Eric

Well, I’m hoping to correct the record here.

Wireshark and Ubuntu 18.04+

If you’re doing packet analysis and run Debian/Ubuntu, you may have noticed that Wireshark is currently at version 3.0.2 (at the time of writing this), but both Debian and Ubuntu are running 2.6.x versions of Wireshark (Debian Stretch is at 2.6.7-1, and Ubuntu 18.04 is at 2.6.8-1). While Fedora 30 is running Wireshark 3.0.1, even Ubuntu 19.10 (Eoan) is still running Wireshark 2.6.9-1 (again at the time of writing this).

Wireshark Logo

Now for probably really good reasons, there still isn’t a Wireshark 3.0.2 deb package for Debian-Ubuntu distributions, and if you just so happen to be at Sharkfest 2019 running some flavor of Debian/Ubuntu and you’re taking the packet analysis classes, you needed to be running Wireshark 3.0.2. Of course, you could just fire up a VM on your laptop and run Windows, or grab that random spare Mac in your bag — why you have a spare Mac in your bag is beyond me — but your only option is to compile from source the Wireshark package.

Background On Compiling and Installing Wireshark 3.0.2 for Ubuntu Desktop 18.04

The first thing to note here is that the previous post focused on 3.0.1, but that wasn’t the most recent Wireshark source, so for this we’re updating to 3.0.2.

Next, when compiling applications from source, usually the approach is to extract the tarball, then run ‘configure, make, make install’ and you’re done. However, Wireshark actually has info on how to build this within the tarball in a file called “INSTALL” (I know, I pretty much can hear “RTFM” as I type this). Starting at about line 191, the file says:

11/b. If you ‘re running a system that supports APT (Debian/Ubuntu/etc.)
run

dpkg-buildpackage -us -uc -rfakeroot

in the source directory right after extracting of checking out
Wireshark’s source code. (You don’t have to run configure/make/etc.
prior to running dpkg-buildpackage)

Ok, great, but if you run the command above, you’ll likely find that you have a few dependencies that you’re missing. The instructions below should help clear this all up.

Compiling and Installing Wireshark 3.0.2 for Ubuntu Desktop 18.04

Disclaimer: like I noted in my previous post, Wireshark is a complicated application, and I am not a developer, so my instructions could have some flaws (they certainly have improved). My main intent here is to just share the dependencies needed to get Wireshark 3.0.2 compiled because otherwise you’re going to be running the dpkg-buildpackage command, get the dependency error messages, Google the dependency package for Ubuntu, install it, then find the next one over and over again — if only someone just posted the dependencies!

Install the Dependencies

First off, let’s install all the dependencies needed (there’s a lot):

sudo apt install build-essential gnutls-bin qtbase5-dev qtbase5-dev-tools qttools5-dev qttools5-dev-tools qtmultimedia5-dev libqt5svg5-dev libpcap0.8-dev flex zlib1g-dev debhelper po-debconf libtool python3-ply libc-ares-dev xsltproc dh-python docbook-xsl docbook-xml libxml2-utils libpcre3-dev libcap-dev bison quilt libparse-yapp-perl libgnutls28-dev libgcrypt20-dev libkrb5-dev liblua5.2-dev libsmi2-dev libmaxminddb-dev libsystemd-dev libnl-genl-3-dev libnl-route-3-dev asciidoctor cmake libsbc-dev libnghttp2-dev libssh-gcrypt-dev liblz4-dev libsnappy-dev libspandsp-dev libxml2-dev cdbs dh-translations intltool jq libfile-which-perl libjq1 libonig4 libpython-stdlib libsnacc-dev libsnacc0c2 omniidl python python-minimal python2.7 python2.7-minimal python3-scour scour snacc snacc-doc libzstd-dev libbrotli-dev libspeexdsp-dev

(Update 20200101: I’ve updated the dependencies to include the following that were missing before: libzstd-dev libbrotli-dev libspeexdsp-dev.

Grab the Source Tarball and Set Up the Build Environment

After doing this a few times, I learned that it’s easier to set up a build directory because when you run the dpkg-buildpackage command, it’s going to build .deb files in the parent directory of the extracted tarball directory (see later). Let’s create the build directory, grab the source tarball, and extract it:

mkdir wireshark_build
wget https://2.na.dl.wireshark.org/src/wireshark-3.0.2.tar.xz
tar xf wireshark-3.0.2.tar.xz
cd wireshark-3.0.2

Build Wireshark 3.0.2

Assuming everything above went off without a hitch, we should be able to build Wireshark now. Within the ‘wireshark-3.0.2’ directory, run the following command:

dpkg-buildpackage -us -uc -rfakeroot

dpkg-buildpackage’ is a program that builds packages for installation; the command won’t install Wireshark (that comes next), but it does build the .deb files for installation. The process can take anywhere from 10-30 minutes (maybe more) depending on your system. Once the process is done, in the parent directory (‘wireshark_build’), you should see the following deb files:

libwireshark12_3.0.2_amd64.deb
libwireshark-data_3.0.2_all.deb
libwireshark-dev_3.0.2_amd64.deb
libwiretap9_3.0.2_amd64.deb
libwiretap-dev_3.0.2_amd64.deb
libwscodecs2_3.0.2_amd64.deb
libwsutil10_3.0.2_amd64.deb
libwsutil-dev_3.0.2_amd64.deb
tshark_3.0.2_amd64.deb
wireshark_3.0.2_amd64.deb
wireshark-common_3.0.2_amd64.deb
wireshark-dbg_3.0.2_amd64.deb
wireshark-dev_3.0.2_amd64.deb
wireshark-doc_3.0.2_all.deb
wireshark-qt_3.0.2_amd64.deb

Now we can install the packages.

Install Wireshark

To the install the packages above, within ‘wireshark_build’, run the following command:

sudo dpkg -i *.deb

You’ll likely get a prompt during the install about dumpcap and running as root. Basically, it’s best practice to not run Wireshark as root but to instead create a group that has permissions to capture packets. During the .deb installation, the installer will create the group ‘wireshark’, so enter ‘Yes’ at the prompt to create the group, then add your user account to the group with the following command:

sudo usermod -a -G wireshark <your_username>

If during the install you have dependency errors, usually that can be resolve by running an apt install fix that will install the dependencies and finish the Wireshark install:

sudo apt install -f

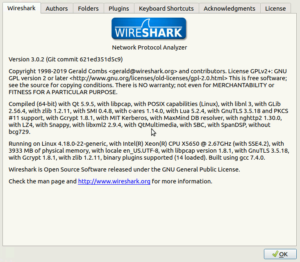
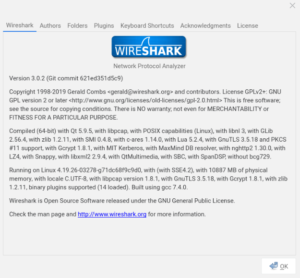
Assuming everything went well, Wireshark should be installed and you should get the following under Help > About Wireshark:

About Wireshark Information 3.0.2
Ubuntu Desktop 18.04
Wireshark 3.0.2 - On Crostini Ubuntu 18.04
ChromeOS Crostini – Ubuntu 18.04

BCG729 Package Missing

One thing to note is that there is one package that is missing from these instructions: BCG729. BCG729 is a an open-source encoder/decoder for the G729 codec, and if you wish to have that, you’ll need to build and compile that before you build and compile the Wireshark .deb files. More info on that here.

That should be it! Happy packet analyzing!